Friday, November 27, 2009

Daring Bakers Challenge (My Very First) for November '09: Cannoli!

Did I tell you that I recently joined the Daring Bakers? Well I did, and this month I took part in my first challenge recipe--cannoli!

Just in case you're reading this and you're unfamiliar with this group, allow me to enlighten you: The Daring Bakers are comprised of hundreds (if not thousands?) of home bakers throughout the world who take on a common recipe "challenge" each month. They make the recipe, photograph their results, and post their results online. The recipes selected are typically inherently tricky and potentially rather involved, so they are indeed challenging. The new challenge recipe for each month is revealed to members at the very beginning of any given month, and they are required to keep it under their hat until the 27th of each month. On the 27th, it's kosher for all members to post their results. Sounds fun, doesn't it?

Here's the official low-down on the November challenge, directly from the Daring Bakers site . . .

"The November 2009 Daring Bakers Challenge was chosen and hosted by Lisa Michele of Parsley, Sage, Desserts and Line Drives. She chose the Italian Pastry, Cannolo (Cannoli is plural), using the cookbooks Lidia’s Italian-American Kitchen by Lidia Matticchio Bastianich and The Sopranos Family Cookbook by Allen Rucker; recipes by Michelle Scicolone, as ingredient/direction guides. She added her own modifications/changes, so the recipe is not 100% verbatim from either book."

* * * *

All of the photos in this post are from my cannoli preparation experience, which took place just a couple of hours ago. (I think my house is going to smell like frying oil for at least a week.) I followed the recipe closely for the shells, but I haven't yet made the traditional filling that includes ricotta cheese. I just filled a few of the shells with whipped cream that I sweetened with confectioners' sugar, vanilla extract, and a dash of cinnamon, and I dipped one in mini-chocolate chips and another one in chopped peanuts.

It was a fun recipe to prepare, and a very unusual one for me. I have extremely little experience with deep frying and I don't honestly want to become an expert at it (far too fraught with danger, if you know what I mean!) but it all went swimmingly. I thought the recipe and instructions provided were very accurate. The dough, just as we were all warned, was hard to roll out--very springy and stretchy--but once rolled out it was easy to roll it onto the metal cannoli forms, and the finished cannoli were actually pretty easy to slide off of the forms.

The recipes below, with specific instructions and notes, have been copied in their entirety directly from the Daring Bakers site, just fyi (their words, not mine!).

* * * *

Lidisano’s Cannoli

Makes 22-24 4-inch cannoli
Prep time:
Dough – 2 hours and 10-20 minutes, including resting time, and depending on whether you do it by hand or machine.
Filling – 5-10 minutes plus chilling time (about 2 hours or more)
Frying – 1-2 minutes per cannoli
Assemble – 20–30 minutes

RECIPE NOTE: THE EQUIVALENTS FROM THIS RECIPE WERE PREPARED USING THIS CONVERSION SITE: http://www.gourmetsleuth.com/index.asp.

CANNOLI SHELLS
2 cups (250 grams/8.82 ounces) all-purpose flour
2 tablespoons(28 grams/1 ounce) sugar
1 teaspoon (5 grams/0.06 ounces) unsweetened baking cocoa powder
1/2 teaspoon (1.15 grams/0.04 ounces) ground cinnamon
1/2 teaspoon (approx. 3 grams/0.11 ounces) salt
3 tablespoons (42 grams/1.5 ounces) vegetable or olive oil
1 teaspoon (5 grams/0.18 ounces) white wine vinegar
Approximately 1/2 cup (approx. 59 grams/approx. 4 fluid ounces/approx. 125 ml) sweet Marsala or any white or red wine you have on hand
1 large egg, separated (you will need the egg white but not the yolk)
Vegetable or any neutral oil for frying – about 2 quarts (8 cups/approx. 2 litres)
1/2 cup (approx. 62 grams/2 ounces) toasted, chopped pistachio nuts, mini chocolate chips/grated chocolate and/or candied or plain zests, fruits etc.. for garnish
Confectioners' sugar

Note - If you want a chocolate cannoli dough, substitute a few tablespoons of the flour (about 25%) with a few tablespoons of dark, unsweetened cocoa powder (Dutch process) and a little more wine until you have a workable dough (Thanks to Audax).

CANNOLI FILLING
2 lbs (approx. 3.5 cups/approx. 1 kg/32 ounces) ricotta cheese, drained
1 2/3 cups cup (160 grams/6 ounces) confectioner’s sugar, (more or less, depending on how sweet you want it), sifted
1/2 teaspoon (1.15 grams/0.04 ounces) ground cinnamon
1 teaspoon (4 grams/0.15 ounces) pure vanilla extract or the beans from one vanilla bean
3 tablespoons (approx. 28 grams/approx. 1 ounce) finely chopped good quality chocolate of your choice
2 tablespoons (12 grams/0.42 ounces) of finely chopped, candied orange peel, or the grated zest of one small to medium orange
3 tablespoons (23 grams/0.81 ounce) toasted, finely chopped pistachios

Note - If you want chocolate ricotta filling, add a few tablespoons of dark, unsweetened cocoa powder to the above recipe, and thin it out with a few drops of warm water if too thick to pipe.

DIRECTIONS FOR SHELLS:
1. In the bowl of an electric stand mixer or food processor, combine the flour, sugar, cocoa, cinnamon, and salt. Stir in the oil, vinegar, and enough of the wine to make a soft dough. Turn the dough out onto a lightly floured surface and knead until smooth and well blended, about 2 minutes. Shape the dough into a ball. Cover with plastic wrap and let rest in the fridge from 2 hours to overnight.

2. Cut the dough into two pieces. Keep the remaining dough covered while you work. Lightly flour a large cutting or pastry board and roll the dough until super thin, about 1/16 to 1/8” thick (An area of about 13 inches by 18 inches should give you that). Cut out 3 to 5-inch circles (3-inch – small/medium; 4-inch – medium/large; 5-inch;- large. Your choice). Roll the cut out circle into an oval, rolling it larger and thinner if it’s shrunk a little.

3 Oil the outside of the cannoli tubes (You only have to do this once, as the oil from the deep fry will keep them well, uhh, oiled..lol). Roll a dough oval from the long side (If square, position like a diamond, and place tube/form on the corner closest to you, then roll) around each tube/form and dab a little egg white on the dough where the edges overlap. (Avoid getting egg white on the tube, or the pastry will stick to it.) Press well to seal. Set aside to let the egg white seal dry a little.
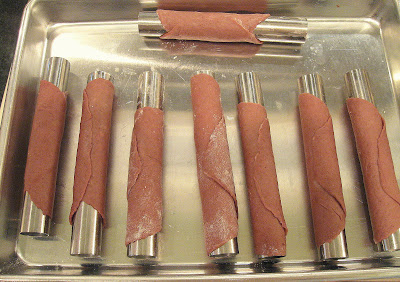
4. In a deep heavy saucepan, pour enough oil to reach a depth of 3 inches, or if using an electric deep-fryer, follow the manufacturer's directions. Heat the oil to 375°F (190 °C) on a deep fry thermometer, or until a small piece of the dough or bread cube placed in the oil sizzles and browns in 1 minute. Have ready a tray or sheet pan lined with paper towels or paper bags.

5. Carefully lower a few of the cannoli tubes into the hot oil. Do not crowd the pan. Fry the shells until golden, about 2 minutes, turning them so that they brown evenly.

8. Lift a cannoli tube with a wire skimmer or large slotted spoon, out of the oil. Using tongs, grasp the cannoli tube at one end. Very carefully remove the cannoli tube with the open sides straight up and down so that the oil flows back into the pan. Place the tube on paper towels or bags to drain. Repeat with the remaining tubes. While they are still hot, grasp the tubes with a potholder and pull the cannoli shells off the tubes with a pair of tongs, or with your hand protected by an oven mitt or towel. Let the shells cool completely on the paper towels. Place shells on cooling rack until ready to fill.

9. Repeat making and frying the shells with the remaining dough. If you are reusing the cannoli tubes, let them cool before wrapping them in the dough.

Pasta Machine method:
1. Divide the dough into 4 equal pieces. Starting at the middle setting, run one of the pieces of dough through the rollers of a pasta machine. Lightly dust the dough with flour as needed to keep it from sticking. Pass the dough through the machine repeatedly, until you reach the highest or second highest setting. The dough should be about 4 inches wide and thin enough to see your hand through

2. Continue rolling out the remaining dough. If you do not have enough cannoli tubes for all of the dough, lay the pieces of dough on sheets of plastic wrap and keep them covered until you are ready to use them.

3, Roll, cut out and fry the cannoli shells as according to the directions above.

For stacked cannoli:
1. Heat 2-inches of oil in a saucepan or deep sauté pan, to 350-375°F (176 - 190 °C).

2. Cut out desired shapes with cutters or a sharp knife. Deep fry until golden brown and blistered on each side, about 1 – 2 minutes. Remove from oil with wire skimmer or large slotted spoon, then place on paper towels or bags until dry and grease free. If they balloon up in the hot oil, dock them lightly prior to frying. Place on cooling rack until ready to stack with filling.

DIRECTIONS FOR FILLING:
1. Line a strainer with cheesecloth. Place the ricotta in the strainer over a bowl, and cover with plastic wrap and a towel. Weight it down with a heavy can, and let the ricotta drain in the refrigerator for several hours to overnight.

2. In a bowl with electric mixer, beat ricotta until smooth and creamy. Beat in confectioner’s sugar, cinnamon, vanilla and blend until smooth. Transfer to another bowl and stir in chocolate, zest and nuts. Chill until firm.(The filling can be made up to 24 hours prior to filling the shells. Just cover and keep refrigerated).

ASSEMBLE THE CANNOLI:
1. When ready to serve..fill a pastry bag fitted with a 1/2-inch plain or star tip, or a ziplock bag, with the ricotta cream. If using a ziplock bag, cut about 1/2 inch off one corner. Insert the tip in the cannoli shell and squeeze gently until the shell is half filled. Turn the shell and fill the other side. You can also use a teaspoon to do this, although it’s messier and will take longer.

2. Press or dip cannoli in chopped pistachios, grated chocolate/mini chocolate chips, candied fruit or zest into the cream at each end. Dust with confectioner’s sugar and/or drizzles of melted chocolate if desired.

TIPS AND NOTES:
- Dough must be stiff and well kneaded

- Rolling the dough to paper thinness, using either a rolling pin or pasta machine, is very important. If the dough is not rolled thin enough, it will not blister, and good cannoli should have a blistered surface.

- Initially, this dough is VERY stubborn, but keep rolling, it eventually gives in. Before cutting the shapes, let the dough rest a bit, covered, as it tends to spring back into a smaller shapes once cut. Then again, you can also roll circles larger after they’re cut, and/or into ovals, which gives you more space for filling.

- Your basic set of round cutters usually doesn’t contain a 5-inch cutter. Try a plastic container top, bowl etc, or just roll each circle to 5 inches. There will always be something in your kitchen that’s round and 5-inches if you want large cannoli.

- Oil should be at least 3 inches deep and hot – 360°F-375°F, or you’ll end up with greasy shells. I prefer 350°F - 360°F because I felt the shells darkened too quickly at 375°F.

- If using the cannoli forms, when you drop the dough on the form into the oil, they tend to sink to the bottom, resulting in one side darkening more. Use a slotted spoon or skimmer to gently lift and roll them while frying.

- DO NOT crowd the pan. Cannoli should be fried 2-4 at a time, depending on the width of your saucepan or deep fryer. Turn them once, and lift them out gently with a slotted spoon/wire skimmer and tongs. Just use a wire strainer or slotted spoon for flat cannoli shapes.

- When the cannoli turns light brown - uniform in color, watch it closely or remove it. If it’s already a deep brown when you remove it, you might end up with a really dark or slightly burnt shell.

- Depending on how much scrap you have left after cutting out all of your cannoli shapes, you can either fry them up and sprinkle with confectioner’s sugar for a crispy treat, or let the scraps rest under plastic wrap and a towel, then re-roll and cut more cannoli shapes.

- Push forms out of cannoli very gently, being careful not to break the shells as they are very delicate. DO NOT let the cannoli cool on the form, or you may never get it off without it breaking. Try to take it off while still hot. Hold it with a cloth in the center, and push the form out with a butter knife or the back of a spoon.

- When adding the confectioner’s sugar to the filling..TASTE. You may like it sweeter than what the recipe calls for, or less sweet, so add in increments.

- Fill cannoli right before serving! If you fill them an hour or so prior, you’ll end up with soggy cannoli shells.

- If you want to prepare the shells ahead of time, store them in an airtight container, then re-crisp in a 350°F (176 °C) oven for a few minutes, before filling.


(If you'd like to comment on this post or read any existing comments, just click on the purple COMMENTS below!)

Tuesday, November 24, 2009

Carrot Cake with Cream Cheese Icing: It's Carrot Love, in Cake Form!

Just in case you haven't yet decided exactly which crowd-pleasin' dessert you're going to whip up for the big day, here's a really good carrot layer-cake recipe that I can recommend without reservation. It has very nice flavor, a soft texture, and it's perfectly moist. On top of all that, it's a complete cinch to prepare and darn near impossible to wreck in the process. The cake batter itself doesn't even require a mixer (not kidding)! I'm bringing one of these cakes to my mother- and father in-laws' house (that would be Nancy and Joe's) for dinner on Thursday.

The recipe I used is one that I adapted several months ago from Perfect Cakes by Nick Malgieri. (This is one of my favorite cookbooks, as you may already know. I raved about it in a past post about banana layer cake, so I'll try to contain myself here and just keep my mind on the carrots.) Anyway, it turned out great the last time I made it, so I thought this might be a nice change from what I usually bring on Thanksgiving. An interesting cheesecake is what I normally show up with, and those have always gotten good reviews. This year, though, I just hope no one is feeling too resistant to change . . . after all, some diners are wedded to certain desserts on Thanksgiving, as you know. I've just, in fact, been informed by my youngest son, Nathan, that he most decidedly will not be partaking of said carrot cake (the poor misguided youngster).

Speaking of change . . .

How did I alter Malgieri's recipe? Well, I added in some coconut (not too much--don't worry), one extra egg, a little bit of vanilla extract, some freshly grated nutmeg, and a very modest amount of salt. The recipe doesn't call for any salt at all, which I think, frankly, is a mistake--though whether one of judgment or omission is anyone's guess. Malgieri also calls for chopped pecans in the batter but I've chosen to omit them since the frosted sides of the cake will ultimately be covered with those babies (yeah, toasted pecans . . . yum). Additionally, the recipe says to add in one 8 oz. can of crushed pineapple along with all of its juice. Now, that's a lot of juiciness--too much, I think--so I've reduced that amount to 3/4 of a cup of crushed pineapple, but I drain and lightly press quite a bit of the juice out first in order to get that 3/4 cup.

Fully frosted with Malgieri's cream cheese icing, and very simply decorated (if you're feeling in the pastry-bag mood, that is), this cake is not only pretty but potentially impressive. It's even pretty without special decorations on the top. The icing recipe is lusciously good; I haven't changed a hair on its head, figuratively speaking. I have no quarrel with it.

This is one cake, I think, that really illustrates the difference between home-baked and store-bought. I mean, really, there is just no comparison. So play your carrots right, bakers, and you'll be on the receiving end of some enthusiastic compliments on Turkey Day!

Carrot Layer Cake

(For a printable version of this recipe, click here!)


Preheat oven to 325 degrees. Butter the bottom of three 9" round cake pans. Line the bottoms with parchment, and butter the parchment.

2 cups All Purpose flour (I used bleached)
2 tsp. baking powder
1 and 1/2 tsp. baking soda
1/2 tsp. salt
2 tsp. ground cinnamon
1/2 tsp. ground nutmeg (I used freshly grated; it's definitely better)
5 large eggs
2 cups granulated sugar
1 and 1/2 cups vegetable oil (I used canola)
2 cups peeled and finely grated carrots (I just shredded them in the food processor)
3/4 cup of crushed pineapple packed in its own juice, with most of the juice drained off
1/2 cup shredded sweetened coconut
1 tsp. vanilla

Stir together well the flour, baking powder, baking soda, salt, cinnamon, and nutmeg in a medium bow. Set aside.

By hand, whisk the eggs in a large bowl. Add in the sugar, continuing to whisk until the mixture looks light--about 1 minute. Pouring in a steady slow stream with one hand, add in the oil while continuing to whisk with the other.

Stir in the carrots, coconut, vanilla extract, and pineapple until well combined.

Fold in the dry ingredients, being careful not to over-mix.

Pour the batter equally into the three pans. Bake the cakes for about 30 to 40 minutes, checking them so they don't over-brown. When the tops are firm and golden, and a toothpick inserted in the center comes out clean, they're done.

Cool them on a rack, in their pans, for ten minutes. Run a knife around the edges of each pan. Invert each cake layer onto a cooling rack and remove it from the pan. If the buttered parchment is already peeling off, gently remove it the rest of the way. If the cake's still quite hot and the paper is adhering to it, wait until the cake is cooler to try peeling it off.

Cream Cheese Icing

12 oz. full-fat cream cheese
12 Tbsp. butter, unsalted, softened
1 Tbsp. vanilla extract
1 cup (or more, just to be on the safe side) coarsely chopped, lightly toasted pecans (To toast them, put them in a 350 oven on a rimmed baking sheet for 10 to 12 minutes; let them cool on the pan.)
6 cups confectioners' sugar, sifted after measuring (I confess I didn't sift! But if you don't feel like sifting, just be sure you use "10x"--aka Domino confectioners' sugar.)

In the large bowl of your mixer, using the paddle attachment on medium speed, beat the cream cheese, butter, and vanilla until very soft and light--about 5 minutes. Decrease the speed to low and gradually beat in the confectioners' sugar. Once the sugar is mixed in, increase the speed to medium and beat 5 minutes longer.

It will be extremely helpful to put your bottom cake layer on a cardboard cake-round before you begin the frosting process. If you're going to hold the fully frosted cake in your hand to put the nuts around the sides, a firm flat surface under the bottom layer is imperative.

If you'd like to decorate the top of the cake, it's also extremely helpful to set it on a cake decorating turntable or even a large lazy susan. You can use a pastry bag and a couple of basic piping tips to add a simple border, if you like, and you could make a few easy rosettes, evenly spaced, using a star tip. Want to make those classic orange carrots with green carrot-tops? Use a round tip for the carrot, and a leaf tip for the carrot-tops. The choice is yours. Practice piping first on a flat surface for a few minutes before you actually do any piping on the cake though, if you're feeling less than confident. Don't worry about those details, though, everyone's going to love your cake and think it's wonderful.

Enjoy, and have a very happy Thanksgiving!

P.S. You might want to refrigerate this cake since the cream cheese icing can get pretty soft, and that can make the whole thing rather difficult to cut neatly since the cake layers are also softer than a typical carrot cake as well.


Recipe full disclosure! I adapted this recipe from the recipe called "Martha Turner's Carrot Cake," on pages 73 - 75 of Perfect Cakes (2002, Harper Collins) by Nick Malgieri.

(If you'd like to comment on this post or read any existing comments, click on the purple "COMMENTS" below!)

Wednesday, November 18, 2009

Create the Universe . . . then Bake the Best Apple Pie You've Ever Imagined . . .

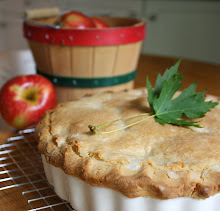
Carl Sagan, the late American astronomer, uttered my favorite pie quote of all time. He said, "If you want to make an apple pie from scratch, you must first create the universe." That's beautiful, isn't it? Now, I know that Carl wasn't really talking about our kind of pie so much as he was commenting on something esoteric and metaphysical and . . . well . . . cosmic. It seems to me, though, a perfectly fitting quotation with which to begin because a few days ago, somehow or other, I managed to bake the best apple pie that my own small universe has yet encountered. The first and only one I've ever concocted that I've been completely satisfied with, and not just satisfied, but astoundingly pleased.

Yes, fellow bakers, you heard me right. After years of less than stellar results, I finally produced what I consider to be a truly fabulous apple pie. Not so-so, not okay, not pretty good. Incredibly good. And just in time for Turkey Day (how timely, how opportune!). It could hardly have occurred at a better moment.

My measuring-cup runneth over . . .

What, you may ask, brought on this little victory? Well, I feel it's largely attributable to cookbook author Nancy Baggett's recipe for deep dish apple pie, which appears in The All American Dessert Book, with particular credit given to her pastry crust. I'd been casually scouting around for a promising apple pie formula over the last few weeks, thinking maybe I'd make one around Thanksgiving. And though I'd never baked what I felt was a really excellent apple pie before, hope--however poignant and naive--does tend to spring eternal.

Of course, there's nothing at all unusual about 90 percent of the fruit pie recipes one runs across. They typically have more in common than not. But there were a couple of factors about Nancy's pie that struck me as uncustomary and intriguing. The crust, for example, calls for a little baking powder, a meaningful portion of cake flour, and--get this--she tells you to lightly grease your pie pan. I've never seen a fruit pie recipe that directs you to grease the pan, but it makes perfect sense doesn't it? Indeed it does.

The gal just likes to tinker . . .


Because I found her crust recipe so interesting, I followed it by the book with no tinkering (I swear, no tinkering at all . . . I'll testify to that in federal court if you want me to). The pie crust, once baked, was flaky, tender, and firm enough to hold up without crumbling to bits. It wasn't too dry, nor was it at all soggy. The taste was just right--very slightly salty with just the tiniest glimmer of sweetness. It was the crust a serious home-baker dreams about producing. In a nutshell, just yummy.

Regarding the apple filling, I did do some substantial tinkering there, but nothing I'd consider radical. What did I change? Well, instead of following her recommendation to use "at least three different kinds of apples," I used only Galas--very crisp and sweet. This was not so much by design as by necessity since I had only Galas on hand and wasn't in a position to run to the market. I figured I'd just take my chances and that turned out to a lucky choice.

Nancy, then, directs readers to slice the apples thinly. I haven't had happy moments with thinly sliced apples in past pies because, in my experience, they have a tendency to turn to unadulterated mush, and there's nothing I find at all appealing about apple filling that resembles apple sauce. So, I cut my apples into generous bite-sized chunks, figuring I wouldn't risk it.

I also knew at the outset of this particular pie venture that I was going to augment the filling with a few cranberries, either dried or fresh (of course, you can always omit these, but why would you want to go and do that? . . . after all, they're such a pretty color, and they're good for you, so just simmer down and surrender to the moment, okay?). I ended up using dried cranberries that I'd soaked in orange juice for about 20 minutes to brighten their flavor and soften them up; that turned out to be an inspired decision, I am convinced. I also upped the amount of cinnamon in the recipe a little bit, and doubled the amount of lemon juice. All in all, the flavor of the filling was fantastic--just perfect.

You never know until you taste it . . .

The pie baked well, and looked fine out of the oven, but I didn't have a clue as to its success-quotient until I actually tasted it. Doubtful of what my tastebuds were conveying, I tasted again . . . and then one more diminutive bite to seal the deal. By golly it was true. "Holy moly," I thought, "Finally. It's about time."

And so it was, just as now it's about time for me to give you the recipe . . .


Apple Pie with Dried Cranberries

(For a printable version of this recipe, click here!)


To make the pastry dough (enough for one double-crust pie):

8 Tbsp. cold unsalted butter, cut into 1/3" chunks
7 Tbsp. solid vegetable shortening, cut or spooned into 14 pieces
2 cups All-Purpose flour
2/3 cup cake flour
1 and 1/2 Tbsp. granulated sugar
1 tsp. salt
1/2 tsp. baking powder
6 to 9 Tbsp. ice water

Freeze the butter cubes and shortening pieces for 20 minutes.

To mix the dough by hand (which is what I did, with my faithful pastry blender):
In a large bowl, completely stir together the flours, sugar, salt, and baking powder. Cut in the fat until the mixture looks like coarse crumbs with a few bits the size of small peas remaining. Scrape up the flour mixture on the bottom of the bowl.

In a small bowl, measure 6 Tbsp. of ice water. With a fork, lightly combine the water, bit by bit, with the flour mixture, tossing until the water is evenly incorporated and the dough begins to form clumps (Nancy notes "15 to 20 strokes" at this point; I wouldn't get too anal about this). Reach down to the bottom of the bowl to make sure all the flour is dampened. Pinch a small bit of dough between your fingers; it should hold together smoothly and be moist but not soggy.

If crumbly or dry, sprinkle over more of the ice water, a couple of teaspoons at a time, tossing with the fork. When the dough is moistened enough to hold together when pinched, gather it up, and press it firmly together with your fingers into a smooth mass.

Divide it into two equal portions and shape each into a disk about 5" across. Wrap each disc in plastic and chill in the fridge for an hour. (The dough can be refrigerated for up to two days, or frozen for up to one month; thaw the dough in the fridge before using.)

To make the apple-cranberry filling:

10 and 1/2 cups peeled, cored apples cut into large bite-sized chunks (I used all Galas)
2 Tbsp. fresh lemon juice
2/3 cup granulated sugar
1/3 cup light brown sugar, packed
3 and 1/2 to 4 and 1/2 Tbsp. cornstarch (use the larger amount if your apples are really juicy; I used 4 Tbsp. in my pie)
3/4 tsp. cinnamon (I used Penzey's Extra Fancy Vietnamese Cassia--it's potent and extremely good)
1 pinch of salt
2 Tbsp. unsalted butter, cut into bits
1/2 cup dried cranberries that have been soaked in a orange juice for 20 minutes or so and then drained
1 Tbsp. half & half for brushing on top of pie dough
1 and 1/2 Tbsp. sanding sugar for sprinkling on top of pie (I prefer the larger sparkly crystals of sanding sugar, but regular granulated sugar will work fine too)

Position a rack in the lower third of the oven and preheat to 400 degrees.

In a very large, heavy, nonreactive saucepan (not a copper pan, basically), toss the apple chunks with the lemon juice. In a small bowl, stir together thoroughly the two sugars, the cinnamon, cornstarch, and salt. Add the sugar mixture and the butter bits to the apples; toss until well combined. Bring the whole mixture to a simmer over medium-high heat. Simmer, stirring and scraping the pan bottom, for about 3 minutes, or until the apples cook down slightly; do not let the apples burn.

Remove the pan from the burner.

Add in the cranberries and stir to evenly distribute them. Taste, and add a dab more lemon juice if you feel it's needed. Set aside.

To roll out the pastry dough:

Lightly grease a 9-1/2" deep dish pie plate (if you have a deep dish pie plate you might as well use that, but I just used a regular pie plate that was 9" in circumference and it turned out fine). If the 5" dough disc is cold and stiff, let it warm up until slightly pliable but still cool. Dust it generously with flour on both sides.

Between two sheets of parchment paper, roll out one dough portion into a circle that's about 13 and 1/2" round. Occasionally check the underside of the dough while rolling and smooth out any wrinkles.

If the dough becomes at all sticky or limp, place it on a cookie sheet in the freezer for about five minutes to firm up. When done rolling, gently peel off the top sheet of paper, then pat it lightly back into place. Flip over, and peel the bottom sheet off the dough. Center the round, dough side down, onto your pie plate. Gently peel off the remaining paper. Smooth the dough into place and patch any tears. Using scissors or a paring knife, trim the overhand to about 1/4". Prick the pastry all over with a fork (I didn't do this; your choice if you want to do it). Loosely cover the pastry and place it in the freezer while you roll out the top crust (I didn't do this either, but I was working pretty fast at this point; basically, just don't let the plated dough get warm at all). Roll out the second portion of dough the same way as you just did above. Transfer the round, with paper still attached on both sides, to a baking sheet and place it in the fridge.

To assemble the pie:
Pour the apple-cranberry mixture onto the bottom crust in your pie plate, mounding the fruit in the center.

Take your top crust dough, and remove one sheet of the paper. Flip that over and center the dough onto the mounded fruit. Peel off and discard the remaining paper. Trim the pie's top overhang to about 3/4". Fold the overhang under the bottom pastry edge to form an edge that rests on the lip of the plate. Press the top and bottom edges together firmly, crimping as you like (with your fingers, or with the tines of a fork, etc.) all the way around.

Cut slashes/vents in the top of the crust for steam to escape, using a small sharp knife (grease the knife if it's not super sharp; I cut five vents).

Using a soft pastry brush (I like to use a floppy silicone brush for this kind of thing), brush the half-and-half lightly on the top--not on the edges--of the pie, and sprinkle the top with the sanding (or granulated) sugar.

Put the pie on a baking sheet (I use an old, stained cookie sheet for juicy pies) to catch any drips. Bake for 25 to 35 minutes, or until the crust is lightly browned. Make a large, loose, foil tent over the top of the entire pie. Continue baking for at least 30 minutes more, or until the top is nicely golden-brown and the filling is bubbly.

Let the pie cool on a wire rack for at least 1 and 1/2 hours, and a few hours longer if at all possible. The cooler the pie is, the neater the slices will be.

* * * * * * *
Wonderful on its own, but also delicious served with a little vanilla ice cream on the side. Hope yours turns out as well as mine did!


Recipe full disclosure! The recipes in this post come from The All-American Dessert Book by Nancy Baggett (2005, Houghton Mifflin). The recipes I used appear on pages 18 - 21, for her "Favorite Deep Dish Apple Pie," and on pages 90 - 91, for "All-Purpose Pie Pastry Dough." As noted above, I adapted the filling recipe. Also, I reworded her instructions slightly, here and there. This is a very good book and I highly recommend it.

(If you'd like to comment on this post or to read any existing comments, just click on the purple COMMENTS below!)

Friday, November 13, 2009

Homemade Pumpkin Ice Cream with Crispy Ginger Cookies . . .

Remember that ice-cream making attachment that I bought for my KitchenAid mixer a few months ago? I first talked about it in June, when I made mango ice cream--does that ring a bell? Well, anyway, since I got it I've tried about five ice cream recipes, only two of which were really very good. One of the good ones was produced this week--that would be pumpkin ice cream.

Now, before this morning, I can assure you I'd never tasted pumpkin flavored ice cream before in my life, nor ever craved it. I know I've never considered ordering anything like it in an ice cream shop, when faced with 31 or more predictable flavors (doubtless I'd pick something chocolatey and very chunky; that seems to be my ice-cream shop M.O.). But, I must say I'm pleased with the way this recipe turned out. It's truly interesting, and seems to have layers of flavor. There's a little grated orange zest in it, and that brightens the taste in a subtle way. It's not like pumpkin pie filling frozen on a stick, in case you were wondering. (Were you wondering?)

There seem to be quite a few variables that affect the success of homemade ice cream, most of which I simply haven't figured out yet. Some recipes contain a cooked custard mixture, others might contain a bit of corn starch, some contain boatloads of heavy cream, while others . . . well, you get the drift. What determines what will help to thicken some ice creams beautifully but not others? Je ne sais pas. (Beats me.) No, I haven't cracked the code yet as to why some recipes work well and others leave much to be desired, but I'm workin' on it. (I think I'd better put David Lebovitz's book The Perfect Scoop on my Christmas list--based on reader reviews, that seems to be the last word lately on great homemade I.C.!)

In keeping with the ubiquitous autumnal theme (there is an autumnal theme that's just raging in food/baking blogs lately . . . raging, I tell you) I figured ginger cookies would complement the pumpkin nicely, so I made a few this morning and they do indeed mesh well. The cookie recipe is one that I adapted from Gourmet magazine, in the December 1998 issue, for "Swedish Ginger Thins." (Poor Gourmet . . . you've probably already heard over and over that the magazine's just closed up shop. What a pity and a shame.) They're really very much like ginger snaps, except not rock hard and super crunchy. In fact, these are nicely crispy on the outside, in a tender sort of way, and a little bit soft and chewy on the inside. They're so thin, I'm not quite sure how they accomplish that feat, but they do.

These are cookies that are designed to be rolled out and cut with a cutter, but that can be a hassle with this type of very sticky, soft dough (even when properly chilled, this type of dough gets soft again at the speed of sound). I made a few of them that way, but then decided to just scoop the rest and press them down with the bottom of a glass dipped in sugar, in the interest of time and sanity. Those would be the round ones you see in the photos.

I altered the recipe just a bit, by racheting up the ground ginger, racheting down the ground cloves, adding a smidgen of salt, and omitting the almonds entirely. I also revised the instructions slightly. They indicate, for eg., that you should use a rolling pin cover and a pastry cloth--I assume because of the stickiness of the dough. I don't know about you, but I don't routinely use those items, and though I own a rolling pin cover I don't even remember where it is!

The ice cream recipe came from the book Ice Cream and Frozen Yogurt, by Gar and Mable Hoffman, and it couldn't possibly be simpler. The only thing I'd do differently, if I were to make this recipe again, would be to strain the liquid ice cream mixture before it goes into the fridge to chill.

Pumpkin Ice Cream

(For a printable version of this recipe, and the ginger cookie recipe below, click here!)


16 oz. of canned pumpkin
1 cup brown sugar, packed (I used light brown)
1/4 tsp. ground cinnamon
1/8 tsp. ground nutmeg (I used fresh grated nutmeg)
1/4 tsp. ground ginger
1 cup half & half
1/2 tsp. grated orange zest
2 cups heavy cream

Combine all ingredients in a large bowl. Chill or freeze according to your specific ice cream maker's instructions. (For the KitchenAid attachment, I chilled the liquid for at least a full day in a glass bowl before churning it in the ice cream attachment; then I poured that into a glass container, covered it, and froze that for a full day before serving it. It gets very firm.)

Crispy Ginger Cookies

3 cups All Purpose flour
1 and 1/2 tsp. baking soda
1 and 1/2 tsp. ground cinnamon
2 tsp. ground ginger
1/2 tsp. ground cloves
1/2 cup well-chilled heavy cream
1/2 cup unsalted butter, softened
1 cup granulated sugar
1/2 cup dark corn syrup

In a medium bowl combine the flour, baking soda, spices, and salt. Set aside.

In a small/medium bowl with an electric mixer, beat the heavy cream until it just forms firm peaks. Set aside.

In a large mixer bowl, with the paddle attachment, beat the butter and sugar together until light and fluffy. On low speed, add in the corn syrup and the whipped cream, beating just until combined.

Add the flour mixture and beat until well combined.

Form the dough into a disk, and chill it in the fridge overnight, or in the freezer for an hour or so. Preheat your oven to 400 degrees and line your cookie sheets with parchment paper.

Cut the dough into quarters and work with one section at a time, keeping the others in the fridge while you work. If you want to use cookie cutters, roll out the dough to about 1/4" thickness, space the cookies at least 2" inches apart, and bake for about 7 minutes.

If you'd prefer not to use cutters, use a small scoop to portion your cookie dough. Dip the dampened bottom of a glass in sugar and press that into the top of the cookies to flatten them a bit. They'll spread out quite a bit on the pan. Bake them for about 7 minutes.

Let your cookies cool on the pan until they seem stiff enough to move to cooling racks.

Yummy with milk, or how about with pumpkin ice cream?


(If you'd like to comment on this post, or to read any existing comments, just click on the purple COMMENTS below!)