Friday, December 31, 2010

So Long 2010 . . . You were a Sweet, Tasty, and Memorable Year!


The New Year will arrive in just a few hours, so what better time than the present to do a quick recap of Jane's Sweets & Baking Journal's 2010 highlights? It was indeed a sweet, tasty, and memorable year. Here's a little sampling of one item from each month . . . these were among my personal favorites!

January 2010 --The Sweet Potato Pound Cake . . . this turned out to be one of those recipes that really surprised me. Who would have thought you could make something so pleasing from a humble potato?


February2010 -- Orange Polenta Cake with Sweet Citrus Glaze . . . and who knew that a simple cake containing corn meal and olive oil could be so appealing? Not me, until I tried this recipe.


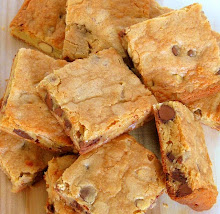
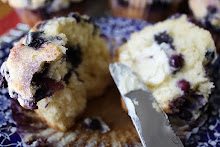
March 2010 -- Jumbo Blueberry Muffins . . . (oh, and did I mention these are BIG?) Rarely does a muffin  evoke stares of  amazement like these babies do. Not just because of their mighty girth, mind you, but because of their extreme Yum Factor.


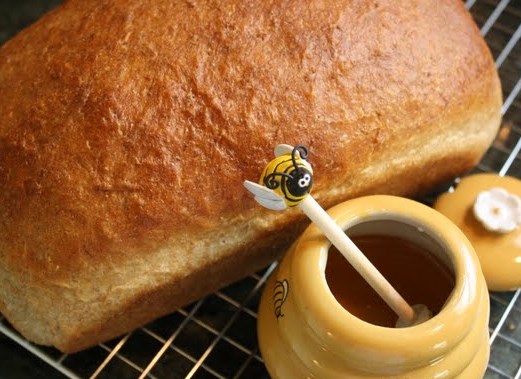
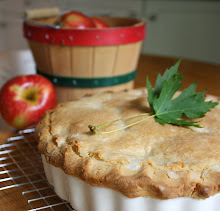
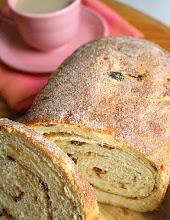
April 2010 -- Honey Oatmeal Sandwich Bread . . . this post was bittersweet because it centered on  my father-in-law, "Grandpa Joe," whom we'd lost a few days before I wrote it. He loved to bake bread and I couldn't help thinking of him while I prepared this recipe.


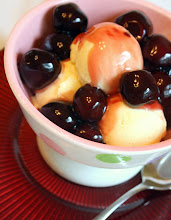
May 2010 --Tart Cherry Frozen Yogurt with Crispy Honey Cookies . . . mmmm, tart is right! I'd never made frozen yogurt before, and I was tickled pink with the way it turned out. The crunchy honey cookies were a fine foil for the lip-puckering tang of this bright fro-yo! This post was also one of my faves because it documented a robin's nest, with two lovely eggs in it, that a mama bird built in a little flower pot hanging on our fence. My family and I monitored its progress like anxious parents-to-be until the babies hatched and, after a couple of weeks, flew off to see the world and make their own families.


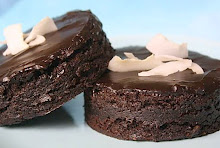
June 2010 -- Chocolate-Filled Coconut Macaroon Sandwich Cookies . . . no, these weren't those fragile pastel treats that have been all the rage for a couple of years now in baking circles . . . but they're just as good, if not better! The hubby and I loved these cookies. Recommended!


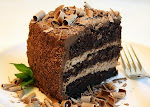
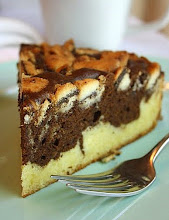
July 2010 -- Chocolate Mousse Dream Cake . . . This one was dear to my heart, but not just because it's a fabulously decadent cake. I made this for my 14-year old son Nathan's birthday, at his special request. Not only was it a luscious dessert to serve at any birthday, it was a poignant birthday celebration to me because my littlest boy just isn't little anymore!


August 2010 -- Sparkling Peach Cobbler with Prosecco, Ginger, and Honey . . . I never was a big one for cobbler--not until I cooked this up! One of the best homestyle/summertime/fresh-fruit concoctions I think I've ever tasted. Sparkling is right! Sparkle on!


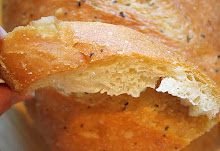
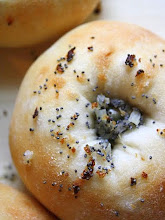
September 2010 -- Parmesan, Herb, and Garlic Popovers . . . that's right, pop on over to my house for the most startling popovers around! These guys knocked my socks off. They'll defy all your popover preconceptions--no kidding! And, gosh, do they ever smell fantastic!


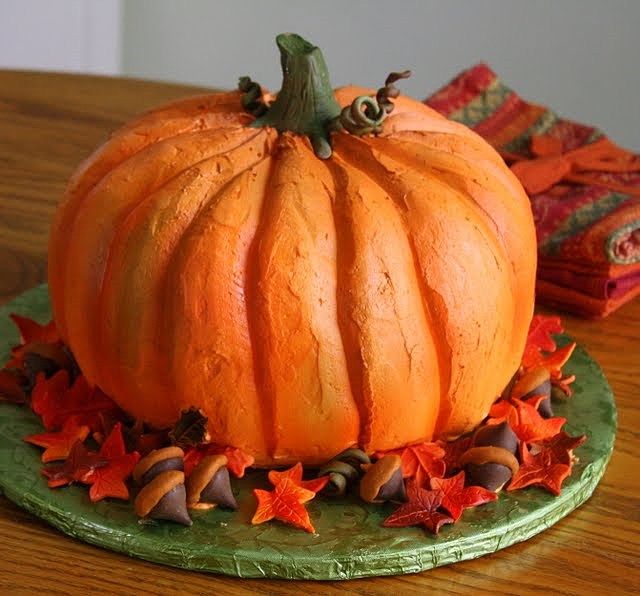
October 2010 -- The Cake that Thinks it's a Pumpkin . . . this is what you might call a cake with an identity crisis but, oh, what an intriguing crisis to have! I never expected to get such a big reaction out of the people who saw this cake--one that I made in my Theme Cakes class. What a lot of fun it was to work on this.  And easy? Anyone can make it . . . I sketched out instructions in the post.


November 2010 -- Apple, Quince, and Pear-filled Sweet Rolls . . . nothing like a nice breakfast roll, warm, sweet, and sticky with autumn's most charming fruit. I made these on a school day when my Pastry I class was unexpectedly canceled. It was a much enjoyed windfall of free time that I chose to spend in the kitchen--of course!


December 2010 -- Sam the Snowman Cake . . . I have to tell you that I feel a special kinship with this fictional character now, after having spent so dang much time on this cake! Heck,  I'll never be able to watch Rudolph on TV again without thinking about it. It's like the cake-decorating equivalent of a getting a tattoo.


Wow, 2010 sure went by fast, didn't it? I know I'm looking forward to whatever 2011 brings to us bakers, one and all. Expect I'll be whipping up something new to share with you in a couple of days. Until then,  Have the happiest New Year ever!!

Warmly,
Jane   :)

* * * * * * * * ** * * ** *

(If you'd like to comment on this post, or to read any existing comments, please click on the purple COMMENTS below!)T

Friday, December 17, 2010

Chocolate Walnut Rugelach . . . Like Christmas, it Comes but Once a Year!

It's a good thing that the level and intensity of baking that occurs in preparation for Dec. 25th happens only once a year. Despite our love for all-things-baking, we also love being able to fasten the top button of our pants--am I right?

That's just one of the reasons why homemade rugelach happens in my household once a year and once a year only. Oh yes, rugelach is delicate and delicious. Given its ingredients, it'd better be! Butter, cream cheese, and flour, all wrapped around sweet jam, finely chopped nuts, and sometimes (hopefully) chocolate. It's all in there.


Like the Ghost of Christmas Present, rugelach swoops in and, just as swiftly, swoops out. That's as it should be. Enjoy it while it's here, and look forward to its brief appearance again next year.


About this recipe . . . 

Today's treat comes from one of the greatest chocolate-baking resources I've ever found, Chocolate American Style, by food writer Lora Brody. This volume exudes a warmth that will envelope you.


No, let me rephrase that . . . It will enrobe you, because that's what fine melted chocolate does. Just ask any chocolatier! It's a book so luscious, you won't know whether to read it or take a bite of it, but I advise that you do the former.

I adapted this recipe slightly by rewording it, by adding a tiny amount of sugar to the dough, and by using an egg wash topped off with a petite sprinkling of cinnamon sugar before baking. Note that the recipe indicates use of a food processor, though you can try making it by hand with a pastry blender.

Chocolate Walnut Rugelach

(For a printable copy of this recipe, click here!)

For the dough:

8 oz. full-fat cream cheese, chilled and cut into small chunks
1/2 lb. (2 sticks) of unsalted butter, chilled and cut into small chunks
2 cups all-purpose flour
1/4 tsp. salt
2 tsp. sugar

For the filling:
1 cup finely chopped walnuts
3/4 cup semi-sweet mini chocolate chips (Definitely use the mini-morsels or, if you can't find those, chop regular size semisweet chips evenly into small bits. Because the filling provides almost all the sweetness, you might want to stick with semi-sweet versus trying dark chocolate; I considered substituting dark chips--just because I adore dark chocolate--but realized that could make these rugelach simply not sweet enough.) 
1 tsp. ground cinnamon (Optional, per the cookbook, but I included this and I recommend it.)
1/3 cup apricot jam/preserves

For the top:
1 large egg lightly beaten with 1 Tbsp. cold water
1/4 granulated sugar, mixed with 1/2 tsp. ground cinnamon


In a medium bowl, whisk together the flour, salt, and sugar.  In the large bowl of your food processor (fitted with the metal blade), place the chilled cream cheese and butter chunks, along with the flour mixture. Process until the dough comes together to just form a ball.

Divide the ball of dough into equal quarters, then flatten each quarter into a disk and wrap it securely in plastic wrap. Chill the dough for three or more hours, or overnight (I chilled mine overnight; it was very easy to work with the next day--not too soft or sticky).

When you're ready to roll out and form the rugelach, preheat your oven to 400 degrees. Line one or two cookie sheets with parchment paper.

In a medium bowl, mix together the chocolate chips, chopped walnuts, and cinnamon.

Heat the apricot jam in a small bowl; do this slowly in the microwave, or in a small saucepan over a low flame. The jam needs to be fluid enough for you to brush it onto the dough. Keep the jam warm.


Work with just one piece of dough from the fridge at a time. On a well floured work surface (I used a thin plastic mat designed for rolling out dough or fondant, with measured circles on it--very helpful, but of course not necessary!), roll the dough into a circle that's no more than 8 to 9 inches in diameter. If you roll it too thin, it may tear when you try to roll it up. Using a pizza wheel or a sharp knife, cut the circle into eight equal wedges.

Brush the cut wedges with a thin layer of the warm jam. (I used a small paint brush--dedicated to food use only!--because of its soft bristles. This dough is tender and a coarse brush can mangle it. A soft silicone brush works well too.) 


Sprinkle about 1 tsp.--not much more or it will just spill out the sides--of the filling mixture onto each dough wedge.


Starting at the wide end of each one, roll the wedge up snugly without stretching the dough and place it on your cookie sheet. Brush the top of each with the egg wash and sprinkle with a pinch or two of the cinnamon sugar.


Bake the rugelach for 10 minutes; check to see how quickly it's browning (not a bad idea to peek at the bottom of one piece as well), and reverse the cookie sheet from front to back. Bake another 3 to 5 minutes. Remove the rugelach as soon as they appear lightly golden. Allow them to cool on the cookie sheet, set on a cooling rack, for five minutes before removing them to cool on the rack on their own.


(If you'd like to comment on this post, or to read any existing comments, please just click on the purple COMMENTS below!)

Sunday, December 12, 2010

Cinnamon Cranberry Shortbread . . . Simplify the Christmas Cookie Marathon!


When your holiday to-do list is longer than the tobaggon hanging on the wall in your garage, how do you  find the time and energy to enjoy non-critical tasks like making cookies without that activity, too, seeming like just another chore? If you're like me, every year you wish you had the time and gusto to make at least a dozen varieties of Christmas cookies, some from brand new recipes and some from old faithfuls. In theory, the cookie-baking marathon sounds so delightful, doesn't it?


Think about it. There you are, bustling around in the kitchen, carols playing in the background, snowflakes twinkling on the window sill. Maybe you're even wearing that cute apron--the one that's been in a drawer for the past ten years because you've never had the guts to expose it to robust molasses or melted dark chocolate? I know, I know. I've been there. Sometimes the Christmas cookie mega-bake experience is just a pipe dream.


But then again, maybe it's not? I figure the answer to this dilemma is two-fold. It requires breaking the work down into chunks--like making the doughs all in one long work session, and then baking the cookies in another. Of course, even that prospect can be daunting. So if you're really stressed, consider making it easier on yourself by using just one base recipe for a simple but fail-proof cookie that can be adapted with any number of different flavorings or add-ins.

Shortbread is a perfect candidate for this approach because:
  • it's comprised of very few ingredients and mixes together fairly quickly
  • it handles easily compared to stickier roll-out doughs for gingerbread or sugar cookies
  • it can be pressed into tart pans by hand, or rolled out and cut with cookie cutters
  • it bakes slowly and at a low temperature, which greatly minimizes the chances of burning the cookies
  • it's sturdy and not delicate, thus not problematic to store or ship
  • it has a long shelf life and can handle reasonable variations in temperature
  • it can be customized with the addition of chocolate, with finely chopped nuts or dried fruits, or any variety of extracts--try vanilla, citrus, or almond
  • the finished cookies can be dipped in melted chocolate, glazed with a thin icing, or sprinkled with sugar

Just remember, don't fiddle with the the proportions of flour, sugar, and butter. They're kind of sacrosanct in a scenario like this. But everything else is up for grabs. Really. It's a miracle cookie. It's the original Christmas Miracle Cookie! Not kidding. So don't panic if you committed to producing a zillion cookies for this office party and that church event. Stick with one basic recipe, adjust it to suit your whims, and everything will be fine. These cinnamon cranberry shortbread cut-outs are a case-in-point. Made from a recipe I adapted, they won't let you down.

This is adapted from the classic shortbread recipe in Dede Wilson's book, The Baker's Field Guide to Christmas Cookies.

Cinnamon Cranberry Shortbread Cookies
(For a printable version of this recipe, click here!)

Preheat oven to 325 degrees. Line a couple of cookie sheets with parchment paper.

1 lb. of unsalted butter, softened (4 sticks)
1 cup granulated sugar, plus a little extra for sprinkling
5 cups all-purpose flour
1/4 tsp. salt (a generous 1/4 tsp.; I think a wee bit of salt is vital in a cookie--without it, it's just flat)
3 drops vanilla extract
2 drops almond extract
1/2 tsp. ground cinnamon (or less, if you prefer; more, though, can overpower this recipe)
3/4 cup dried cranberries chopped very small (loosely packed into the measuring cup)

In a large bowl, whisk together the flour, salt, and cinnamon. Set aside. 

In the large bowl of your mixer, beat the butter at medium high speed for three minutes, until light and fluffy. Still on medium high speed, slowly pour in the sugar over a period of about 8 minutes (yes, I said 8 minutes), until the mixture is almost white in color and extremely fluffy. Add in the vanilla and almond extracts.

Now on the lowest speed, add in the flour mixture in three portions, mixing just until each portion is  incorporated. Pour in the cranberry pieces and beat only until they seem fairly evenly distributed in the dough, not long at all. The dough should not be so soft that it needs to be chilled before rolling.

Divide the dough into thirds. Working with one third at a time, on a lightly floured work surface, roll the dough out to about 1/4" thickness--no thinner. Using small cookie cutters of your choice, firmly cut the pieces and place them carefully onto a parchment-lined cookie sheet. They can be placed pretty close together as they'll spread very, very little in the oven. Sprinkle each cookie with a couple pinches of granulated sugar.


Bake each tray for approximately 15 minutes or more, checking the cookies regularly; remove them from the oven when they just start to turn slightly golden around the edges. They're not supposed to become golden brown all over. Allow them to cool on the pans for 10 minutes before removing them to cooling racks.

Alternately, you can press the dough evenly into 8" or 9" tart pans with removable bottoms. This is a very quick and easy method if you don't feel like using cookie cutters. Sprinkle sugar on top and place the pans on top of cookie sheets to bake. If you make them this way, slice the baked cookies pie-wedge fashion while they're still somewhat warm from the oven; if you wait to slice them until they're cool, they'll be far more prone to breaking apart.


(If you'd like to comment on this post, or to read any existing comments, please click on the purple COMMENTS below!)

Friday, December 10, 2010

Sam the Snowman Cake . . . from Rudolph!


One must have a mind of winter
To regard the frost and the boughs
Of the pine trees crusted with snow . . .

-- from The Snowman, a poem by Wallace Stevens
 
Before we get too much further into the Christmas season, I wanted to be sure and share this with you. It's my attempt at replicating, in cake form, the snowman from that favorite old TV special made in 1964, Rudolph the Red-Nosed Reindeer. I created it as my final-exam project for my Theme Cakes class, which ended in November. Since making this cake, I've come to the conclusion that just about every American under 75 must be a big fan of Sam the Snowman, the show's chubby narrator.


He's a pretty distinctive fellow, as far as snowmen go. Both wise and witty, he's possessed of a philosophical outlook not common to your typical garden-variety snowman. When he tells us to, "Pull up an iceberg and lend an ear," we're inclined to do just that. And isn't there something especially appealing about a dapper snowman who sounds just like Burl Ives?


I'm not going to confess exactly how long it took me to work on this cake, all in all, nor how much  fretting I did in preparation for assembling it. Needless to say, the process was time consuming for me and fraught with potential pitfalls. That's because this kind of cake--one requiring quite a bit of advance planning, not to mention structural support and anchoring--is still pretty new for me. I was more relieved than I can convey when the finishing touches were completed on the last day of class.


You know how it is when you work on something that requires you to immerse yourself in its every detail? You become acutely aware of the finished product's imperfections and those are what you tend to focus on. That's how I felt, initially at least, when this cake was done and largely why I was stunned when my teacher and fellow students liked it so much.


Chef Lois, my teacher, asked me if she could keep the cake to display it at a couple of upcoming culinary-school sponsored events. I was pretty flattered by this. She suggested that I first take it home to show to my husband and kids (who'd been hearing me fuss about it for at least a couple of weeks) and then bring it back to school. So that's what I did.


Thankfully, it was a very successful project all in all, and Sam turned out to be a pretty fun character to try and depict in cake. For those of you who want to know how this cake was created, click here for the gory details. For those of you who become nauseous or disoriented at the mere thought of making something like this, you have my sympathy. I'll understand completely if you need to stop reading right now. Yes, you may be excused. Go bake some cookies instead . . . or get a start on wrapping those presents!


(If you'd like to comment on this post, or to read any existing comments, please click on the purple COMMENTS below!)

Friday, December 3, 2010

Scotch Oat Crunchies . . . Sandwich Cookies with Raspberry-Key Lime Jam

Somewhere along the line in my evolution as a typical female, I veered off the path and began to loathe massive shopping malls. Oh sure, I roamed them like a free-range sheep when I was much younger, often along with a small flock of friends. We'd meander happily, a little cluster of girls window shopping just for fun.


But I rarely venture into them now, preferring instead to hunt for exactly what I need online, or in the sort of free-standing stores that hold the potential for incredible bargains and unique discoveries. I'm talking about places like TJMaxx, HomeGoods, Tueday Morning, Marshalls, and the odd second-hand shop. Of course, many of these establishments are neatness-challenged and a few of them lack every semblance of organization, so it's advisable to be completely okay with that before you ever set foot in the door.


In prowling for treasures, the potential for causing an avalanche is ever present. Gotta keep an eye out for that Kilimanjaro-like pile of cartoon-print pajama pants to your left, the ones that someone slung hastily atop a leaning tower of bone china dinner plates. Successful navigation through the labyrinth of aisles, each one stuffed to the gills with goods, requires nimble maneuvering and a light touch. But, such drawbacks aside, these joints do cater fairly well to the average gal's yen to forage. And when the hunt yields up something worthwhile, there's that little ping of satisfaction, that feeling of Oh, good! This errand was definitely worth my time. Do you know what I mean?


In one such store a few days ago, I unearthed a nicely discounted jar of  Sarabeth's Kitchen raspberry key-lime jam. Tucking it into my floppy shopping pouch, I remembered that this crunchy sandwich cookie recipe, which I planned to try out, recommends using a tart jam to augment the pleasant but humble flavor of the cookie wafers themselves. The recipe suggests using cherry jam, which I like, but given the choice I'm more of a pushover for raspberry. This jam's bright flavor gives it a comfortingly homemade quality, and it's not overly sugary (I realize I keep referring to it as jam, but the label on the jar actually calls it "spreadable fruit").


This cookie recipe, dating back to January 1943, comes to us from the new Gourmet Cookie Book: The Single Best Recipe From Each Year 1941-2009. These cookies are very crunchy indeed, so their title is apt. This is the kind of sweet that goes hand in glove with a good cup of hot tea--the perfect cookie for a frosty December day.

I reworded the recipe, adding in more detail, but not altering the time-tested formula.
 
Scotch Oat Crunchies with Jam Filling

(For a printable version of this recipe, click here!)

Preheat oven to 350 shortly before you're ready to bake. Line a cookie sheet with parchment paper.

1 cup unsalted butter, softened
1 cup light brown sugar
2 and 1/2 cups pastry flour (This is hard for home bakers to find in most grocery stores so, alternately, Gourmet suggests the use of White Lily brand flour--that's what I used. Another alternative you might try is to use a 50/50 mix of All Purpose flour and cake flour--that's a typical substitution for pastry flour. Gourmet also suggests using cake flour alone.)
1/2 tsp. baking powder
1/2 tsp. salt
2 and 1/2 oats (I used quick oats.)
1/2 cup cold water
3 drops almond extract and 1/4 tsp. vanilla extract
1/2 cup jam/preserves of your choice

In a very small container, stir together the water and extracts. Set aside.

In the large bowl of your mixer, cream the butter on medium speed until it's almost white; this may take  several minutes. Add in the brown sugar gradually, and continue creaming until completely blended.

Sift together the flour, baking powder, and salt, then sift this mixture again one more time. Stir in the oats.

With the mixer on its lowest speed, add in the dry ingredients alternately with the water. Mix just until fully combined. Cover the dough and chill it for at least half an hour before attempting to roll it out (or chill it overnight, if you prefer, then let it soften slightly before using).

Preheat oven to 350 degrees.

On a well floured work surface, roll a portion of the dough out to a thickness of 1/8" (I rolled my dough a little thicker than this because it was pretty sticky. I didn't skimp on the flour for the work surface.) Use a 2" cookie cutter to cut out rounds or squares, using a thin metal spatula to place them on the parchment lined cookie sheet(s).

Bake the cookies until lightly golden, perhaps 10 to 12 minutes or so. Let them cool before trying to handle them. Fill the cookies with a generous half teaspoon of the jam of your choice, and sandwich two of the wafers together gently. Let the jam set for a while before serving the cookies.


(If you'd like to comment on this post, or to read any existing comments, please click on the purple COMMENTS below!)

Friday, November 26, 2010

Cranberry Snowdrift Bars . . .


Along with producing way too many rolls and whipping up about three times the amount of mashed potatoes actually needed for Thanksgiving dinner, did you also happen to make a hefty surplus of cranberry sauce? You did? Me too. We have a mountain of mashed spuds left. What could I possibly have been thinking as I peeled my millionth potato on Thursday morning? That the Waltons might turn up uninvited on our front porch, with John Boy in the lead?


It's All Gravy . . .

The only thing we never seem to make too much of is gravy, a vital substance. Not unlike human plasma in its importance, it ties the whole feast together. Most folks can't live without it on their turkey, though I've heard that a few can. My two sons, along with a couple of their friends, descended on our kitchen this afternoon after they'd all been out  power-shopping (teenage-boy style power shopping, that is). Clearly ravenous, they attacked the leftover provisions with a vengeance, each plate piled higher than the next. I was grateful that the absence of gravy, which I assume they found startling, didn't dampen their enthusiasm.


About this recipe . . .

In light of the cranberry sauce surplus, I was happy to have an opportunity to try out this surprisingly different recipe that hails from Dede Wilson's book, A Baker's Field Guide to Christmas Cookies. I don't know which appeals to me more, the bars themselves or their cute name. Both are delightful.


These bars start out with a tender-crunchy base, kind of like a shortbread crust. That's baked, and then topped with cranberry sauce, then a meringue is spread over the top of that and it all goes back into the oven. The end result is delicately crisp, sweet, and just tart enough.

I stuck pretty closely to the original formula, just reworded it.

Cranberry Snowdrift Bars
(For a printable version of this recipe, click here!)

Preheat oven to 350 degrees. Coat an 8" x 8" square pan with vegetable spray. 

Ingredients for Crust:
1 and 1/4 cups All Purpose flour
1 pinch of salt
1/2 cup of unsalted butter, softened
1/4 cup granulated sugar
1/4 tsp. vanilla extract

Ingredients for filling and topping:
1 cup whole berry cranberry sauce (homemade or canned; needs to be thick and not watery)
whites from 2 large eggs (about 2 oz. of egg whites, total; whites at room temperature whip up best)
1/8 tsp. cream of tartar
1/2 cup granulated sugar
1/4 tsp. vanilla extract

To make the crust:
Whisk together the flour and salt in a bowl. In the large bowl of your mixer, on medium-high speed, beat the butter for a few minutes, until it's creamy. Gradually add in the sugar, beating now on high speed, until the mixture is light and fluffy; this may take several minutes. Add in the vanilla. In thirds, pour in the dry ingredients gradually, beating just until blended.


Pat the crust firmly and evenly into the bottom of the prepared pan. Chill in the fridge for 30 minutes, or in the freezer for about 15 minutes, before baking.


Bake until dry to the touch and light golden brown, with darker golden areas around the edges--about 30 to 40 minutes. Don't turn off the oven when you take the pan out.


Cool the pan on a rack for five minutes, then spread the cranberry sauce over it.

Make the meringue topping:
In a smaller mixer bowl, using the whip attachment, whip the egg whites on high speed until foamy. Add in the cream of tartar and beat until soft peaks form. Then, gradually add in the sugar, beating on high until stiff--but not dry--peaks form. Add in the vanilla.

Spread the meringue evenly over the cranberry filling, using the back of a spoon to push it out to the edges. Make some cute swirls in the top of the meringue.


Put the pan back into the oven, and bake for about 25 minutes, until the meringue is just very lightly browned.


Cool the bars, in their pan, on a cooling rack.
(If you'd like to comment on this post, or to read any existing comments, please just click on the purple COMMENTS below!)