Tuesday, June 29, 2010

This Cookie Stands Alone: Cornmeal Shortbread with Sweet Dried Cherries . . .


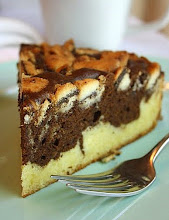
A coy little shortbread recipe has been beckoning to me for a while now, and I finally surrendered to its siren song. It's not just another run o' the mill shortbread, though. How does it differ? Well, it's characterized by a few ingredients that, while common, are each distinctive in their own right. Place them in combination and beautiful things start to happen. I'm talking about elements like exceptionally rich butter, the seeds of a fragrant vanilla bean, enough golden cornmeal to add an intriguing crunch, and  the tastiest dried cherries in the world.


When I gave in to the desire to make this shortbread, my first thought was to pair it with something cool and creamy--maybe homemade ice cream, panna cotta, or pudding. But occasionally, while in the midst of baking, it becomes crystal clear that a finished creation can, and perhaps even should, be allowed to stand on its own. This is one such recipe.

Good classic shortbread excels in showcasing a few basic components--butter, sugar, flour. But, used judiciously, additional items carefully chosen can raise a shortbread's profile in the finest way, and that's what we have here, most notably with the cherries. Now, though, let's talk specifically about the butter for a moment. Have you ever used premium butter in shortbread? The kind of butter that's a couple of percentage points higher in fat than regular butter? It's substantially more expensive than its lesser companions, but the difference it makes in a cookie like this is immediately apparent. In part because it contains less moisture than typical butters, it has not only a positive flavor impact but it also affects texture in certain baked goods, too. Fellow bakers, from the flavor standpoint alone shortbread is made for this stuff. Made for it. If you never use this kind of butter for anything else, at least try it once in shortbread.


I used Plugra, a domestically-made "European style" butter that, though obscenely expensive (in my neck of the woods it's over seven dollars a pound), is extravagantly buttery. Peel back the gold paper wrapping on a brick of this stuff and you'll see just what I mean. It feels especially slippery, and it smells . . . well . . . sort of clean and unadulterated. If butter can be lustrous, this is lustrous indeed. It's probably what the best homemade butter tasted like two hundred years ago, back when cows munched freely on untainted grass, and napped peacefully beneath big shady oak trees. So, if you've never tried any of the fancy high-fat butters on the market (and there are several brands to be found these days), you might want to consider saving your pennies and, just once, giving it a go.


About this recipe . . .

The sum and substance of this recipe is from pastry chef Karen DeMasco's gorgeous book, The Craft of Baking. The adaptations I made to it included doubling the recipe; adding in chopped, dried, Michigan cherries (of course from Michigan, where else?); pressing the dough thickly into two tart pans instead of chilling it, rolling it out, and cutting it with a cookie cutter; and, also, I didn't follow DeMasco's advice to stick the hull of the split vanilla bean in with the dough as it mixed (for some reason that concept didn't appeal to me at the time I was making this, though I have nothing against it in principle). And I reworded the instructions somewhat, as usual.


To gild the lily . . . or not . . .

I did follow DeMasco's suggestion to sprinkle the shortbread with demarara sugar (natural brown sugar produced from the "first crystallization" of sugar cane) prior to baking, but in the future I think I might do without a sugar topping altogether, or use coarse white sugar instead. I say this because the addition of the brown sugar flavor was truly unnecessary to this particular cookie.


Though I love the moist heaviness and unadulterated flavor of  demarara crystals in general, the sugar was superfluous here. It was gilding the lily. And, as I said before, this shortbread cookie stands perfectly well on its own. So there.


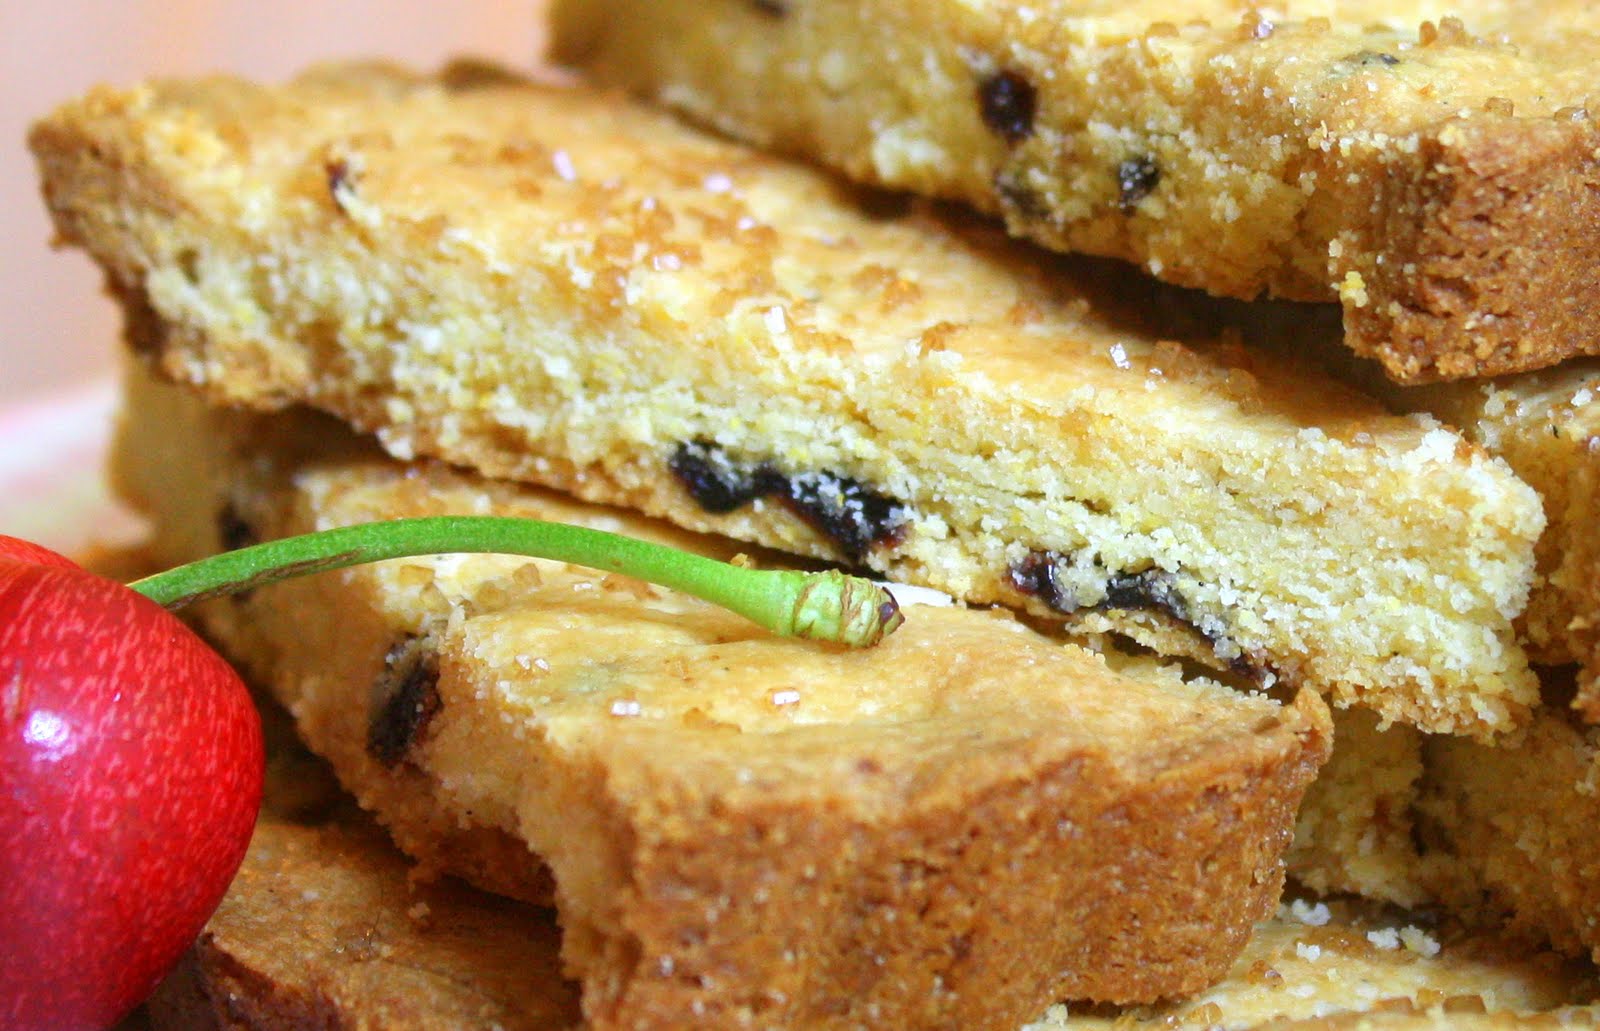
Cornmeal Shortbread Cookies with Sweet Dried Cherries


(For a printable version of this recipe, click here!)

Preheat oven to 350 degrees. Have ready two ungreased tart pans with removable bottoms, each approximately 9 inches in size.

1 and 3/4 cup All Purpose flour, unbleached

1 cup yellow cornmeal, coarsely or finely ground, as you prefer
1 tsp. kosher salt (I think this makes a difference in this recipe, so do use kosher if you have it.)
1 cup plus 3 Tbsp. of unsalted butter (I used Plugra, a high quality, higher-fat butter; I recommend you try this or something similar, though I have no doubt this shortbread is good even with regular unsalted butter.)
1 cup confectioners' sugar, not sifted
1/2 cup of chopped sweet dried cherries
Seeds scraped from 1/2 of a whole vanilla bean 
4 Tbsp. demarara, or coarse white, sugar, if you like (I used the demarara, but as noted in the post, I think next time I'd prefer coarse white sugar instead.) 


In a medium size bowl, whisk together the flour, cornmeal, and kosher salt.  

In the bowl of an electric mixer, using the paddle, combine the butter, sugar, and vanilla seeds for just a minute or so on low speed. 

While the mixer is still on low, add in the flour mixture in two additions, then toss in the chopped cherries. Again mix just until the ingredients are combined. Don't over-mix or let the dough get too warm. (If the dough does seem warm and extremely soft, put it in the fridge for a few minutes to chill.) 


Divide the dough in half and, with your hands, press the dough smoothly and evenly into the tart pans. Using the tines of a dinner fork, divide the dough into slender wedges, like a pie, pressing the tines down to the bottom of the pan. 


Set the tart pans on top of a flat baking sheet, and place the sheet on the middle rack of your preheated 350 oven. Check the shortbread after 15 to 20 minutes; if it appears to be browning too quickly, cover it lightly with foil. Bake until the top is lightly golden, however long that takes, perhaps 10 more minutes. 


Let each shortbread cool in its pan for about five minutes, then remove it from the pan and put it on a cutting surface. With a thin sharp knife, slice it while still warm. If you wait until it's cool, it could crack apart when you attempt to slice it.


(If you'd like to comment on this post, or to read any existing comments, please click on the purple COMMENTS below!)

Wednesday, June 23, 2010

Strawberry Breakfast Bread . . . Wake Up and Smell the Berries!


You know strawberry season is coming to a rapid close in Michigan when you head to your favorite "u-pick" farm and the berry patch is almost deserted. One morning this week, my friend Cathy and I went  to Verellen Orchards, a nice spot about a half-hour's drive from Berkley, the small city where we both live.


It was a sunny, breezy day. As we stepped inside the open-air farm stand to check in, the sweet, humid scent of  strawberries saturated the air.


Empty berry baskets in hand, we made our way into the rows of low-growing plants. Aside from one lone woman a short ways away, intently working to fill her basket, we had the patch pretty much to ourselves. The few viable strawberries still in the field were well concealed beneath that distinctive bushy foliage.  I picked less than half of one flat, all in all, and most of the fruit I took was very small, blood red, and incredibly juicy. Many of my strawberries were almost past their prime.


Once I got them home and had a chance to give them all a good close look, I realized I'd have to weed out quite a few and discard them. The next morning, feeling that familiar yen to bake and realizing there was no time to waste in making use of my limited haul, I briskly sorted, cleaned, and trimmed the remaining fruit, then spent a few minutes paging through cookbooks looking for a quick recipe to make good use of what I'd salvaged before it all turned into a fragrant bowl of rose-colored mush.


I soon found one that fit the bill. In adapting it from a formula for strawberry walnut bread, in The King Arthur Flour Baker's Companion, I made a number of changes. Chief among them, I left out all of the walnuts. Walnuts and strawberries don't always fraternize successfully, as far as I'm concerned. Flung together in a salad, they have a reasonable shot at getting along, but in baked goods I'm often doubtful about their compatibility.


Also, in terms of adaptations, I used about two-thirds mashed strawberries, along with one-third mashed ripe banana, instead of using strawberries alone. (That languishing banana was starting to resemble a  Dalmatian with no get-up and go. I had to put it to work somehow.) You could, though, use all mashed berries and no banana if you like. Bananas are not mandatory.


Oh, and you'll notice the recipe calls for a tiny bit of lemon oil; this, too, is not mandatory, so don't panic. I realize not everyone has this stuff laying around. If you like, add in a little lemon zest, lemon extract, or lemon juice instead. Or, nix that citrus aspect entirely.

I thought my 13-year old son, Nathan, wouldn't detect the pathetically small amount of lemon oil that I used, but I was wrong. As usual. He has no use for baked goods that contain anything citrusy, and he identified the barely perceptible presence of lemon after about two bites of this bread. He remarked to me, with mild adolescent disdain, "Mom, I can always tell when you put lemon in baked stuff. And I can always tell right away whenever you poison your baked goods with zucchini, too."  Yeah, okay dude. I get it. But no one said anything about zucchini so just simmer down.


Moving on . . . in addition to the alterations above, I adjusted the amount of salt upward (and I used kosher salt), added in a wee bit of baking powder to give the loaf some extra oomph, and last but not least I made the strategic decision to add in two generous tablespoons of whole ground flax-seed meal. You ever use this stuff? I'm kind of a newbie with it, but so far I like it.

 
Used judiciously, even a little flax-seed meal adds a rich golden color, ups the nutritional benefits (flax is  a mega-supplier of Omega 3, antioxidants, etc.), and lends an interesting dimension to the overall flavor of certain baked goods that white flour simply can't provide. If, though, you couldn't care less about using the ground flax-seed meal (I understand), just leave it out and add in a couple extra tablespoons of white or whole wheat flour. The resulting loaf will just be less golden brown throughout, but I'm sure it'll still be darn tasty.


When all was said and done, I was more than satisfied with this bread, and completely content with the alterations I made. It's a quick bread that's moist but not wet, mildly sweet yet not at all bland, and substantive without being heavy. I topped it off, right before it went into the oven, with a sprinkling of sanding sugar--always a nice touch on this kind of item. This baby can be put together in a flash, and the one loaf that I made finished baking in about 40 minutes.


Strawberry Breakfast Bread


(For a printable version of this recipe, click here!)

Preheat oven to 350 degrees. Grease and flour, or spray with baking spray, a 9" x 5" loaf pan.

1 and 1/2 cups All-Purpose flour (I used unbleached)
2 Tbsp. whole ground flax-seed meal
1 cup sugar
1/2 tsp. baking soda
1/4 tsp. baking powder
Scant 1/2 tsp. salt (I used kosher)
A pinch of nutmeg (I used whole nutmeg)
1/4 tsp. lemon oil
2 eggs, large
3/4 cup mashed ripe strawberries
1/2 mashed ripe banana
1/2 cup vegetable oil (I used canola
1 to 2 Tbsp. of sanding sugar (or granulated sugar)

Whisk together the flour, flax-seed meal, sugar, baking soda, baking powder, salt, and nutmeg in a large bowl.


In a medium bowl, mix together the eggs, lemon oil, mashed strawberries and banana, and oil.


Add the liquid ingredients to the dry ingredients, and fold with a spatula only until all the batter is just moistened.


Pour the batter into the prepared pan and sprinkle the top with several pinches of sanding sugar, or granulated sugar. Bake the loaf for about 40 minutes, until golden brown and a toothpick inserted in the center comes out mostly clean. Check the bread about 20 minutes into the baking time. If the bread appears to be browning too quickly, cover it lightly with foil.

Let the baked loaf cool in its pan, on a rack, for 15 minutes. Remove it from the pan and let it finish cooling on the rack,


(If you'd like to comment on this post, or to read any existing comments, just click on the purple COMMENTS below!)

Saturday, June 19, 2010

Fresh Apricot Cinnamon-Chip Muffins . . . Tart & Sweet!


Here we are, moving into the tail end of June, and the onslaught of bright, fresh, summer produce is finally upon us. Among other things, this means that we now have access to a multitude of reasonably priced, and adorably cute, apricots.


A sensitive and delicate fruit, so they say, the apricot is a bit of a homebody that, apparently, doesn't cope well with traveling. It's easily bruised and it doesn't care for the jostling, tight quarters, and  occasional indignities inherent in a long-distance journey. Perhaps you feel the same way?


Because of this, only about one quarter of the apricots grown in the U.S. actually make their way to retail markets, so the experts say. These are picked just at the beginning of ripeness, when still firm. But what of the remaining 75 percent? Those lucky fellows are allowed to linger on the trees and, as a result, grow remarkably sweeter than their less fortunate counterparts; they end up canned, frozen, dried, and so on. This means that the fresh apricots you lovingly select one by one in your local grocery store may indeed be cute, but it's a roll of the dice as to whether or not you'll find yourself smiling or puckering after you bite into one.


This all just seems to make sense, though, doesn't it? One could make the case that it's analagous to life. Aren't we sweeter when we aren't rushed? Aren't we more appealing when we've had a good supply of uninterrupted leisure in which to sleep, dream, and reflect? Of course we are.


It's not always a baker's tragedy, though, if the apricots to be used in a recipe lean toward the tarter end of the spectrum. Perhaps two thirds of the apricots that I used in these muffins were kind of astringent, while the rest were only mildly sweet. I think, though, that in certain cases a flavorful but tart chunk of fruit balances remarkably well with its more sugary surroundings. These muffins present a perfect example. The cinnamon chips provide a burst of sweetness here and there that equalizes and nicely offsets the surprising tang of any less-than-fully-ripe fruit pieces.


About this recipe . . . 

Adapted from a blueberry muffin recipe in Flo Braker's wonderful book, Baking for All Occasions, I made a number of changes in order to produce these. In addition to substituting apricot chunks for blueberries,  I swapped out a bit of the white flour in favor of a small portion of whole wheat flour and oats. Instead of using buttermilk, which I love but didn't have on hand, I used half sour cream and half milk, along with a smidgen of lemon juice. I omitted the lemon zest.


And, instead of  dipping the warm muffin tops in butter and then plopping them enthusiastically in cinnamon sugar, as Flo indicates should be done, I lightly brushed the tops with melted butter and sprinkled them with just a very small amount of cinnamon sugar. It seemed to me they would have been practically inedible if I'd followed Flo's recommendation to dip them in her "doughnut topping," because melted butter sops up a huge amount of sugar (ever noticed this?).


I was pretty pleased with how these came out. The texture was right on target--really tender with no tough or rubbery aspect whatsoever--and the muffins had fine flavor. The cinnamon chips that I used came from King Arthur Flour, so of course they weren't cheap. But less costly brands of cinnamon chips are pretty common in grocery stores now, too. If you'd prefer to skip the cinnamon chips altogether, certainly do so; you might want to just add in some cinnamon with the dry ingredients--maybe a teaspoon or less--before they're mixed with the liquids. The muffins won't be as sweet without the chips, but they'll still be good, I'm sure of it.


Apricot Cinnamon-Chip Muffins

(For a printable version of this recipe, click here!)

Preheat oven to 375 degrees, and prepare a 12-cup muffin pan with paper liners, or spray liberally with baking spray.

For the batter:
1 and 1/2 cups All-Purpose flour (I used unbleached)
3 Tbsp. whole wheat flour
1/4 cup regular or quick-cooking (not instant) oats
1/2 cup granulated sugar
2 tsp. baking powder
1/2 tsp. baking soda
1/2 tsp. salt (I used a generous 1/2 tsp.)
1/2 cup sour cream
1/2 cup milk (I used 2 percent)
3 oz. unsalted butter, melted and slightly cooled (aka 3/4 of one stick, or 6 Tbsp.)
2 eggs, large
1 tsp. fresh lemon juice
1 tsp. vanilla extract
1 cup of unpeeled fresh apricot pieces, chopped small
2/3 cup mini cinnamon chips 

For the topping:
1/4 granulated sugar
1/2 tsp. ground cinnamon
2 oz. unsalted butter, melted (1/2 of one stick, or 4 Tbsp.)

In a large mixing bowl, using a whisk, combine the white flour, whole wheat flour, oats, sugar, salt, and baking soda.

In a medium size bowl, using a spoon, blend together the sour cream, milk, melted butter, eggs, lemon juice, and vanilla extract.

Add the liquid mixture into the dry ingredients and stir together until just combined; use care not to overmix. With a spatula, gently fold in the apricot pieces and the cinnamon chips.

Fill the muffin cups about 3/4 full. Bake on the middle rack of your oven for approximately 20 minutes, until light golden brown and the centers spring back when lightly pressed with a finger.


Cool the muffins in the pan for about 10 minutes. Remove them from the pan to a cooling rack. Using a pastry brush, coat the tops with melted butter and a small sprinkling of cinnamon sugar.


(If you'd like to comment on this post, or to read any existing comments, just click on the purple COMMENTS below!)

Tuesday, June 15, 2010

Strawberry Cheesecake with Cookie Crumb Crust . . . Thinkin' Pink!


"I found I could say things with color . . . that I couldn't say any other way--things I had no words for." 
-- Georgia O'Keefe


My three favorite colors are pink, red, and pale green. I would go so far as to say that I crave them. I suspect I may even feel cheerier when wearing one of them. My mood is calmer in a tranquil room that's been painted a cool shade of celery. It's no surprise my kitchen is that very shade, as it has been for several years and I haven't tired of it yet. Place a stem or two of pink flowers in a little jar of water on the kitchen table, and I'll delight in them until they fade away.


Just as we're influenced by the hues we see around us everyday--in our houses, in our cities, and in nature--I assume that the colors we're faced with when we sit down to a meal must impact us in similar ways. I know that I'm a pushover for pretty food. And color accounts for a huge part of the "pretty factor," don't you think?


I do appreciate the sight of  pink food--frosted cupcakes, strawberry ice cream, raspberry yogurt. Heck, I can even muster up a yen for cotton candy or Bazooka bubble gum now and again, though it's questionable whether those items qualify as real food. And vibrant red food gets my seal of approval, too; perfect garnet cherries, the blazing sunset stripes of a ripe mango's skin, even ketchup-red tomatoes, still warm from the vine.


Culinarians assert that we "eat with our eyes," and there is plenty of proof to back up that statement. In cake decorating classes, they make a point of teaching the principles of the color wheel since this kind of visual harmony is integral to a well-designed cake. A poorly executed use of color on a cake is immediately apparent, have you noticed? It does its utmost to turn you off. Think of those garish frosted cakes that you stroll past in the grocery store each week. They virtually scream out, "Hey, you! Look at me! Yeah, you! I'm bright and hideous and I clash!"

Color is important when you're baking. Don't think it's not . . .

I had pink on my mind when I decided to make this particular cheesecake. I expected, when I began preparing it, that it was going to be nicely pink throughout. The cheesecake photo in the cookbook was distinctly pinkish, positively blushing, in fact. And my finished batter was charmingly girlish.


But, alas, the oven changed all that. Ultimately, I ended up with kind of an ivory filling overlaid with just the slightest hint of pink, and dotted throughout with bits of rosy strawberry here and there. Not the glorious pink cheesecake of my dreams, but still good. I guess even a smidgen of pink is better than none.


About this recipe . . . 

Hailing from the book, Diner: The Best of Casual American Cooking, by Diane Rossen Worthington, this recipe includes both a small amount of fresh, ripe strawberries, along with strawberry jam, to give it its signature flavor. I stuck pretty closely to the original formula for the filling, but instead of using the called-for graham crackers in the crust, I used vanilla wafers. I also omitted lemon zest, because the recipe already includes a significant amount of lemon juice, and I just didn't want to overdo it.


I baked the cake on Saturday afternoon, put it in the fridge as soon as it was completely cool, and served it on Sunday evening. The cake turned out well, but I thought it actually tasted considerably better the day after it was first sliced. Some cheesecakes are just like that; I know this always seems to be true with pound cakes, and I assume it has to do with the incredibly rich ingredients taking a while to sort of mingle, get comfortable, and settle down. The texture seemed much nicer to me after a couple of days in the fridge.


The recipe didn't indicate that you should use a water bath for baking, so I threw caution to the wind and didn't bother with that. Consequently, my cheesecake did crack on top, about an hour after it was out of the oven. I wasn't terribly concerned about this, however, because I'd planned from the get-go to cover the top with a modest layer of whipped cream.


Were I to make this cake again, I probably would choose to employ a few more of the typical cheesecake precautions to help prevent the cracking (for eg., tips like being super careful not to over-beat the batter and incorporate too much air;  baking the cake in a foil-wrapped pan that's placed in a water bath; running a knife around the cake sides right before it goes into the oven and shortly after it's out of the oven). Anyway, I'll be more careful next time.


I'd never made a strawberry flavored cheesecake before, but it's a nice variation on plain vanilla or chocolate. Next time, though, I'm makin' it more pink. I think.


(Please note that in the photos below it looks like quite a lot of batter. That's because, when I made it, I doubled the recipe and made two cakes. But the recipe as printed for you below makes just one cake.) 


Strawberry Cheesecake with Cookie Crumb Crust


(For a printable version of this recipe, click here!)

Preheat oven to 350 degrees. Butter the bottom and sides of one 9.5" springform pan. Place a circle of parchment over the buttered bottom, and butter the parchment.

For the crust:
2 cups crushed vanilla wafer (or plain shortbread) cookie crumbs
2 Tbsp. granulated sugar
6 Tbsp. unsalted butter, melted

For the filling: 
24 oz. cream cheese, softened and at room temperature
1 and 1/4 cups granulated sugar
6 large eggs, at room temperature
2 cups sour cream, at room temperature
1/3 cup All Purpose flour
2 tsp. vanilla extract
fresh juice of one whole lemon, strained
1/2 cup strawberry jam (with any large fruit chunks broken up)
1/2 cup of finely chopped, hulled, ripe strawberries

To make the crust:
In a small bowl, mix together the cookie crumbs and sugar. Add in the melted butter and stir to combine until all the crumbs appear moistened. Press the mixture firmly into the bottom of the prepared pan, and up the sides of the pan about two inches. Set aside.


To make the filling:

Break the softened cream cheese into chunks and place in a large mixer bowl. With the mixer on medium speed, beat the cream cheese for about 3 minutes, until very soft and creamy.


Add in the sugar and continue to mix on medium speed, for 1 to 2 minutes, until the batter is smooth.


Add in the eggs, preferably one at a time, and beat well after each addition. (Do as I say, not as I did, in the photo below, with too many eggs going in at once!)


Reduce the speed to low, and add in the sour cream, flour, vanilla extract, and lemon juice. Beat just until thoroughly blended. Remove the large bowl from the mixer.


Remove one cup of the batter and place it in a small bowl.


To this small bowl of batter, add the strawberry jam. Stir it in completely.


Add in the 1/2 cup of chopped strawberry pieces, stirring very gently, just until combined.


Pour this mixture back into the large bowl of batter and, stirring by hand, just blend it in.


Pour all of the batter in the pan that's already been lined with the crust. Jiggle the pan gingerly until the top of the batter appears settled and smooth.


Place the cake pan on top of a baking sheet on the middle rack in the oven.

Bake in a preheated 350 degree oven for one hour. Turn off the heat and let the cheesecake rest undisturbed in the oven, with the door closed, for 30 minutes. Place the pan on a cooling rack and let the cake cool completely. (Hopefully, yours won't look like it's been in an earthquake, like mind did below!)


Once the cake is cooled, cover it lightly and refrigerate it, still in the pan, for at least eight hours before slicing. The cake's texture improves after one full day, or even two days, in the fridge. Before attempting to remove the sides of the pan, run a thin knife carefully around the cake's sides. It's easier to slice, and best tasting, if served quite cold. Try it topped with real whipped cream and fresh strawberries.


(If you'd like to comment on this post, or to read any existing comments, please just click on the purple COMMENTS below!)