Thursday, October 28, 2010

The Cake that Thinks it's a Pumpkin . . . Happy Halloween Pumpkin Cake!


Happy Halloween to all you scary, spooky bakers out there. Can you guys believe it's already the end of October? Holy moly, huh? Before you know it we'll be haulin' out the holly (gulp). But never mind about that. Before the calendar advances any further, I just wanted to share with you my contribution to the current spooky festivities. We made these cakes in my Theme Cakes class this week.


Decked out like a pumpkin, complete with curling tendrils , fallen leaves, and acorns, this is a relatively simple cake to construct and decorate. While entirely edible, only the cake itself would be appealing to eat; the little decorations are made of fondant that's been allowed to harden, and then been airbrushed to enhance the colors.


The cake itself is made up of three thick 9" round yellow layers. You can make this easily by combining two cake mixes (forgive me, Gods of from-scratch baking--I swear I only use them for my cake decorating class!), one plain yellow cake and one pound cake (I think Duncan Hines works best). The pound cake gives the cake a firmer texture, and that makes it carvable--a critical quality for a cake like this.

How was this all accomplished? It's really not too complicated. Here's how to make your own:
  • Set the bottom 9" cake layer on top of a cake-board (a round of corrugated cardboard) that is 2" smaller than the cake itself. Put that on a cake decorating turntable. Ice the top of the bottom layer. Put on the next layer and ice the top of that. (We just used plain white buttercream.) Put the third layer on top of that, but don't ice it.
  • Then, trim the top outside edge of the top layer, and the bottom outside edge of the bottom layer, carefully with a sharp paring knife in order to make the whole thing look somewhat rounded. 
  • Now ice the outside of the entire cake with one "crumb coat" of orange buttercream then, keeping the whole cake on the turntable if possible, chill the cake in the fridge. When that coat of icing is firm, then lay on a thick final coat (we used vanilla-flavored, but orange-colored, buttercream) of  icing. (We applied both coats of icing using a pastry bag with a large round tip; you start at the bottom and pipe fat stripes of icing upward to the stem area, then after each coat is piped you smooth the stripes down with a spatula. This just allows you to more evenly distribute the icing all over the cake with less angst--it's the easiest way.)
  • Now, cut a simple little tool made from a firm but flexible piece of thin plastic. It should look like a bat's wing with only two scallops cut out. We just cut ours from the lid of a clear plastic food container (make sure not to make the outer corners too pointy or they'll cut too deeply into the icing). This is used to carve the curved grooves in the pumpkin's surface. Starting at the bottom of the pumpkin, gently curve the piece upward, pressing it slightly into the icing surface. Swipe it all the way to the top of the pumpkin where the stem would go. Wipe off the plastic after every single swipe. Proceed until the whole thing is shaped as you wish.
  • If you have access to a cake-decorating airbrush, know how to use it, and want to add some dimension to the cake with color, you're golden. If not, don't worry about it. You already have a very pretty orange pumpkin cake! You can easily create a stem from fondant that you color green or brown, if you like, or just use something else for the stem. Those little fondant leaves are really easy too (you can use a special fondant cutter for those; all of this fondant related stuff is easily accessible at places like JoAnne's or Michael's craft stores--just check out the cake decorating aisle). Definitely make the fondant items ahead of time (days ahead of time is fine) so they can firm up before you need to use them on the cake.

    Don't be too fear-filled to try this. Like Halloween itself, cake decorating is meant to be enjoyable, and this was a really fun cake to create.

    Have a wickedly tasty Halloween!


    (If you'd like to comment on this post, or to read any existing comments, just click on the purple COMMENTS below!)

    Friday, October 22, 2010

    Orange-Zest & Yogurt Cheesecake . . . with Marcona Almond Brittle


    I experienced a few intriguing culinary firsts this past week. First among them, I learned how to stretch and shape strudel dough in my Pastry I class. I've wanted to witness this procedure, live and in person, for years. It's pretty much a lost art among home bakers. Picture a small cluster of students, all clad in white, solemnly pulling a small lump of dough into a tissue-paper-thin sheet that's several feet long and wide. I felt kind of like I was participating in an ancient ritual. Chef Roger, our normally rather taciturn teacher, was clearly pleased to demonstrate and explain the technique, regaling us with funny anecdotes of the portly Austrian chef who trained him.

    Secondly, I was introduced to the quince! A fruit that looks kind of like a cross between an apple and a pear, I'd never tasted one before. They're not common here in Michigan, and not a single student in our class could identify one when the Chef showed it to us.  The following day, I discovered some at the grocery store and scooped up four to take home, so now I'm on the hunt for a good recipe to try them out.


    Third on my list of firsts was the creation of a fondant-covered cake designed to look just like a wine bottle, made in my Theme Cakes class. I was pleased with the results but realized only after I brought it home that I'd made a spelling error in French, piped in curly script out of black buttercream, onto the bottle's label! (I should have spelled the word "petite" with no "e" at the end, using the masculine form! Quelle tragedie! Je ne parle pas tres bien francais.  Ah, well.)

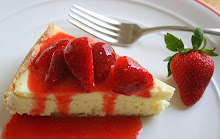
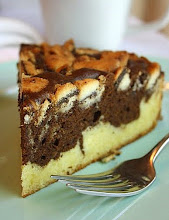
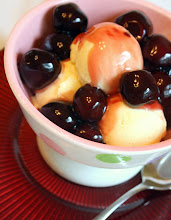
    The fourth notable first was the creation of this fluffy yogurt-based cheesecake, along with the accompanying brittle garnish made from Marcona almonds. I'd never made a cheesecake that was so dependent upon yogurt before, nor had I ever tried the famous Spanish Marconas.


    I've read rave reviews in the past about these special almonds so when I stumbled upon them recently in Trader Joe's, I grabbed one of the little pouches. Consider yourself forewarned that these babies don't come cheap. They cost about the same as macadamias, but really are delicious. Not as hard and crunchy as regular almonds, they're also rounder and sweeter. A fine nut to use in brittle. I recommend them.


    About this recipe . . .

    Among my favorite dessert cookbooks is Dolce Italiano: Desserts from the Babbo Kitchen, by Gina de Palma, and both recipes are adapted from it. I altered the recipes for the cake and the brittle a bit. I decided to flavor the cake with orange zest and a dab of orange extract, so it wouldn't be just plain vanilla.


    And also, because I didn't have any mascarpone cheese on hand (though I love that stuff!), I substituted cream cheese mixed slowly with a bit of heavy cream. And, I changed the brittle formula by using salted Marcona almonds instead of the indicated pine nuts. I figured the pine nuts' strong flavor in combination with the delicacy of the orange would be like putting a lion in a lace dress--not a good combo. Luckily, the changes I made worked out splendidly. Always a relief when this happens! 


    This crustless cake is rather airy and fragile in comparison to a typically dense cheesecake. It's a light fresh  alternative to the norm, and the addition of the buttery, sweet-salty, crushed brittle topping adds unique texture interest. Very tasty indeed.

    Orange Zest & Yogurt Cheesecake 
    with Marcona Almond Brittle 

    (For a printable version of this recipe, click here!)

    For the cheesecake:

    Preheat your oven to 350 degrees, and lightly butter a 10" springform pan. Sprinkle a couple teaspoons of granulated sugar in the pan to coat the bottom and sides; tap out the excess. Fit a couple sheets of foil tightly around the outside of the pan, beneath the bottom and up the sides. This will sit in a water bath while the cheesecake bakes, so the foil sheets really need to be able to keep the water out. You'll need a large pan that's deep enough to accommodate a couple of inches of water, and wide enough to hold your cake pan without it touching the sides.

    3/4 cup granulated sugar
    3 cups of plain, unflavored Greek-style yogurt (I used the higher fat variety)
    1 lb. of cream cheese, softened and slowly but thoroughly mixed with 3 Tbsp. heavy cream (In lieu of this, the original recipe calls for 1 and 1/2 cups of mascarpone cheese; I didn't have that on hand so this was a good substitute.)
    3 Tbsp. confectioners' sugar
    3 large eggs, at room temperature
    6 large egg yolks, at room temperature
    1/2 tsp. kosher salt
    1 and 1/2 tsp. vanilla extract (I used 1 and 1/2 tsp. of vanilla bean paste instead; it is a thick liquid that visibly contains vanilla bean seeds)
    1 tsp. orange zest
    1/2 tsp. orange extract


    In the large bowl of your electric mixer, using the paddle attachment, beat together the yogurt, the cream cheese-heavy cream mixture (or the mascarpone if you're using that), the 3/4 cup granulated sugar, and the confectioners' sugar on medium-low speed. Beat until it's smooth and creamy, for about 1 minute, stopping once to scrape the bottom and sides of the bowl.


    One at a time, add in the egg yolks and the whole eggs, just until each one is incorporated, still at medium-low speed. Add in the salt and the vanilla extract or vanilla bean paste, then the zest and the orange extract.

    Pour the batter into your prepared, foil-wrapped, springform pan. Place the springform into the larger pan and carefully add water to come about halfway up the sides of the springform. Be careful not to let any water splash onto the batter.


    Cover both pans with a large sheet of foil, tenting it carefully so it doesn't touch the batter; make sure it covers the larger pan completely. Gently transfer this into your oven, on the middle rack.

    Bake for 20 minutes, then rotate the pan 180 degrees. Bake for 20 more minutes, and then remove the foil tent. At this point, the original recipe says that the cheesecake should be "puffy but not cracked, jiggly but not liquid in the center." If that doesn't seem to describe what you see, just keep baking the cake until it's set. (I had to bake mine about 15 minutes longer.) 


    Remove the large pan from the oven. Let the cake cool in its springform pan, still set in the water bath, until the water feels lukewarm. Then remove the springform pan from the water, and continue cooling the cake until on a rack until there's no trace of warmth. At that point, remove the foil from the bottom and sides of the pan.


    Chill the cake, in its pan, in the fridge at least 8 hours before serving. Before removing the sides of the springform, run a thin knife along the inner sides of the pan. Be sure to refrigerate any leftovers, if there are any!


    To make the almond brittle:

    You'll need a cooking thermometer with a probe, or a candy thermometer.

    2 cups granulated sugar
    1/4 cup water
    4 Tbsp. unsalted butter (doesn't need to be soft)
    4 Tbsp. light corn syrup
    2 tsp. kosher salt
    1 and 1/4 cups Marcona almonds

    Use parchment paper to fully line a 13" x 9" jelly roll pan. Grease the paper lightly with butter. In a large heavy saucepan, stir together the water and sugar. Add in the corn syrup and the butter.

    Turn the heat on medium-high and immediately start monitoring the temperature with your thermometer. Bring the mixture to a boil.


    With the heat now on high, continue cooking until the mixture looks golden brown and registers 350 degrees on your thermometer. Immediately turn off the heat and remove the thermometer. Stir in the salt, using a wooden spoon or heatproof spatula, then stir in the almonds. Make sure you coat all the nuts.

    Turn the mixture out onto the buttered parchment in your jelly roll pan, and quickly spread it out so the nuts are in a single layer. (It will still be super hot at this point, so don't touch it with your hands.)


    Let it completely cool before you try to break it into chunks. Store the pieces in an airtight container, and keep it in a cool, dry place. To serve it with the cheesecake, crush a couple of small pieces and sprinkle them over the top of individual slices.


    (If you'd like to comment on this post, or to read any existing comments, please just click on the purple  COMMENTS below!)

    Friday, October 15, 2010

    Did He Just Ask for Brownies? . . . (Dark Chocolate Brownies, Two Ways!)


    Last Sunday afternoon I was busy at the kitchen sink, scrubbing away at an encrusted pan, when my 17-year old son, Charlie, called to me from his comfy perch on the living room couch. "Mommm! Will you make some brownies??"

    Now, Charlie very rarely makes specific baking-related requests of me. The one predictable exception to this being his birthday cherry pie which, naturally, is required only once a year. The rest of the time, he's not under the mystical spell of sweets like the rest of us seem to be, and it shows. He's the skinniest one in the family. You know, the kind of boy who's so busy he forgets to eat? (Yeah. That's a rare talent I've never managed to develop.)

    So, you'll understand when I say that his spontaneous brownie query startled me to the extent that I ceased my scrubbing, gazed out the window a moment to gain my bearings, and replied in all seriousness, "What for?"


    What for, indeed . . . 

    My simple response, translated, actually meant: "Are you asking for brownies right now because you need them for some sort of official function for which you will be rushing off very soon? Are you asking me to whip up homemade baked goods at the absolute last minute because of an event about which you have neglected to inform me, dude?" The fact is, Charlie and his friends--all high school seniors--have more events to attend than you can possibly shake a stick at and, sometimes, it's just better to surrender to it like an incoming tidal wave.

    Anyway, Charlie caught my suspicious tone. He righteously replied, "For us to EAT!"

    Well, that was that. As you can see, I did indeed comply. I made brownies that afternoon. And here they are. One recipe, finished two ways--half the batter with toasted walnuts, baked in a round cake pan, and the other half with semi-sweet chocolate chips, baked in a square pan.


    About this recipe . . .

    This formula is adapted from The SoNo Baking Company Cookbook, a shiny and appealing book by John Barricelli. My little changes included doubling the recipe; adding in a smidgen of coffee flavor, not too much; using Hershey's Special Dark Cocoa for two-thirds of the cocoa powder; and adding in nuts to half the brownies. These are soft, with a semi-chewy, semi-cakey texture and they're not-overwhelmingly sweet like some brownies tend to be. And, luckily, they satisfied Charlie's rare craving for a treat.

    Dark Chocolate Brownies

    (For a printable version of this recipe, click here!)

    Preheat oven to 350 degrees. Brush with softened butter, or spray with baking spray, one 9" x 13" pan, or two smaller pans (I used one 9" round cake pan, and one 8" square pan).

    1 cup All Purpose flour (I used unbleached)
    1 cup cocoa powder (I used 2/3 cup Hershey's Special Dark, and 1/3 cup natural cocoa powder)
    1 tsp. kosher salt
    1/2 tsp. baking powder
    2 pinches baking soda
    1 cup (2 sticks) unsalted butter
    2 cups granulated sugar
    2 Tbsp. light corn syrup
    4 large eggs, at room temperature
    2 Tbsp. vanilla extract
    3/4 tsp. instant coffee, or 1/2 tsp. (or less) espresso powder (omit if you don't like coffee!)
    1 cup semisweet chocolate chips (optional; I put these in half of the batter, into one pan)
    2/3 cup chopped toasted walnuts (optional; I put these in the other half of the batter, into the other pan)

    In a medium bowl, whisk together the flour, cocoa, salt, baking powder, and baking soda.

    In a large saucepan, melt the butter. Remove the pan from the heat, and whisk in the sugar and corn syrup. Add in the eggs one at a time, whisking until well combined. In a very small bowl, stir together the vanilla extract and the coffee/espresso powder until it dissolves. Stir this into the liquid mixture in the pan. Add the dry ingredients into the pan as well, and fold with a spatula until the flour has been incorporated.

    If you're making the brownies "two ways," now is the time to divide the batter equally into two parts, pouring one half into the bowl you used for the dry ingredients. Into one half of the batter, stir in the chocolate chips. Into the other half of the batter stir the walnut pieces.

    Pour the batter into the pans, smooth the tops with your spatula, and bake them on the middle rack of your oven for about 30 minutes, until a toothpick inserted in the center comes out pretty clean. (If you're making one large pan, you may need to bake them longer as they'll probably be a little thicker.) Let the brownies cool on a rack before cutting them.


    (If you'd like to comment on this post, or to read any existing comments, please click on the purple COMMENTS below!)

    Friday, October 8, 2010

    Leave the Bagel . . . Take the Bialy!


    Like almost everyone else in the world, I've never had anything that could truly be called a genuine bialy. Oh sure, I've tried the big puffy things sold in some bakeries and grocery stores that are labeled with the name but, unsurprisingly, those are sorry pretenders. Of course, my situation in this respect is not at all unique.


    Why is that so? Because bialys--the real ones--exist today only in the fading memories of a few individuals. According to food writer Mimi Sheraton, who spent years traveling from country to country in her quest to uncover and document the culinary and social history of the bialy, this is true because the specialized culture that originally produced them disappeared into the mist of time. It vanished not by choice but, sadly, because the Nazis destroyed it in 1941. Most of its surviving inhabitants dispersed, and those were the people Sheraton sought out.


    In The Bialy Eaters: The Story of a Bread and a Lost World, published in 2000, Sheraton takes readers along on a seven-year trek as she journeys the globe hoping to find and speak with emigres who once enjoyed the daily treat of this fragrant, poppy-seed and onion garnished roll. Ground zero for her quest? The diminutive bread's namesake of Bialystok, Poland.


    I happened upon a copy of The Bialy Eaters at the library this summer and it intrigued me. My husband had asked me more than once to try making bialys at home and, not being too familiar with them, I thought the book might lend me insight. After reading it, I was hesitant to give them a try. Described as they were, with bittersweet emotion verging on reverence, I almost felt I'd  be trespassing on hallowed ground were I to attempt them.


    But my husband didn't give up asking and, last Saturday, I finally set aside time to make a batch. Except for their somewhat disappointing shape after being baked--too fat and rounded with no flat crispy section in the middle--I was pleased with them. I would, though, like to try again, and next time I'll take steps to help ensure a more authentic shape. Not that they could ever really be authentic.


    The consensus seems to be that the closest thing to the original bialy--though still not quite like the original--can be found at a bakery called Kossar's in New York City. If I'm ever in the Big Apple, I'd like to stop in and give a Kossar's bialy a try. Until then, I think I can make do with homemade. I'll just have to work on my technique.

    About this recipe . . . 

    I looked over a few contenders before settling on Jeffrey Hamelman's bialy recipe in one of my favorite cookbooks--Bread: A Baker's Book of Techniques and Recipes. I have never had anything but good luck with the formulas in this book, so I figured it was a good bet. I tweaked the onion filling, though. Hamelman's filling doesn't call for poppy seeds, nor does he advise readers to precook the onions at all. I think the inclusion of poppy seeds, particularly, lends something essential. I also added a smidgen of ground black pepper to the mixture.


    Having made these once, I don't think the bialy dough-shaping directions are fully sufficient in Hamelman's book. (Sorry, Mr. Hamelman. I make this criticism with all due respect. Aside from this, I think your book is a real treasure, and I say that from the bottom of my bread-baking heart.) A novice bialy baker needs more detail in order to avoid having the bialys puff up, and close up, into little fat donut shapes. Not only that, the directions indicate that you should let the balls of dough proof on "1/4 inch of flour," but there is no explanation of why doing this is necessary. I was dying to know. I've read a couple of theories about it on the internet since last weekend, but don't you think a cookbook author should give such explanations up front? I do. Did I miss something? I desire enlightenment when I'm baking something new, not bewilderment, and that's especially true for me when we're talking about subtle details. Give me too much info versus not enough.


    The verdict . . .

    Overall, the taste and texture of these bialys was wonderfully satisfying. They're chewy on the outside without the leatheriness of bagels. They have that beautiful onion scent, and what about the yummy little crunch of the poppy seeds? Oh, man. Try one right out of the toaster and butter it while it's still warm, then bite into the crunchy crust. I predict you'll take the bialy, and leave the bagel behind.


    Bialys

    (For a printable version of this recipe, click here!)

    This recipe makes one dozen bialys. I baked mine on a preheated, cornmeal dusted, baking stone set on the lowest rack of my oven.


    5 and 1/8 cups of high gluten flour (That's about 1lb. and 6 oz.  I actually used 4 cups of high gluten flour, and 1 and 1/8 cups of bread flour because I was a little short on the high gluten. I have found high gluten flour for sale at Whole Foods Market; you can scoop your own there and buy just as much as you need.)

    13 oz. water (slightly over 1 and 1/2 cups)

    2 tsp. salt (I used kosher, and actually used 2 and 1/2 tsp.)

    3/4 tsp. instant yeast (not active dry)


    Onion and poppy seed filling:
    1 medium yellow onion, finely chopped
    2 Tbsp. fresh white bread crumbs
    2 Tbsp. poppy seeds
    ground black pepper to taste

    To make the filling:
    In a small pan, heat 2 Tbsp. of vegetable oil and saute the onions until softened but not translucent.
    Dump the onions into a small bowl and stir together with the bread crumbs, poppy seeds, and pepper. Cover this and set it aside at room temperature for at least a couple of hours. 


    To make the dough: 
    In the large bowl of your mixer, with the dough hook attachment, place all of the ingredients for the dough. (You do not need to proof instant yeast. You can just toss it in there with everything else right at the start--pretty neat, huh?) Mix on the lowest speed for 3 minutes to combine. Continue mixing for about 5 or 6 more minutes; if your mixer will let you knead yeast dough on second speed, use it now. If you're confined to using first speed for all kneading (as I am with my 6 quart KitchenAid mixer, per their dire warnings regarding this kind of thing), that's okay too. 

    The dough should be a dense springy mass when you're done, tacky but not sticky. (And, if you're into taking your dough's temperature, Hamelman says it should be about 76 degrees Fahrenheit at this point.)  

    Put the dough in a bowl that's been sprayed with vegetable spray or lightly greased with vegetable shortening. Cover the bowl with plastic wrap and cover that with a dish towel. 


    Let the dough rise at warm room temperature for two hours total, but one hour into the rising time, uncover it, put it on a floured surface and quickly give it a quick stretch and fold. It doesn't need any more than that at this point so don't overhandle. Put it back in the bowl, cover it again, and let it continue rising. 


    Divide the risen dough into 3 oz. pieces (very helpful to have a food scale on hand for this, but if you don't have one just try to divide it evenly into 12 pieces). Round each piece tightly into a smooth ball, creating a surface tension. Seam side down, place the balls onto baking sheets that have been covered with 1/4 inch of flour. Then cover the balls lightly with plastic that's been sprayed or greased so it won't stick to the dough, and cover that with a dish towel. Let the dough proof fully (ie., have its final rise), on the sheets for 1 and 1/2 hours. 


    Begin preheating your oven and baking stone at 480 degrees (yes, 480) at least half an hour before you'll need to bake. You want it to be completely hot when the dough goes in.


    To shape the balls in preparation for baking, take each one in your hand and press both thumbs into its center, creating an indented hollow; don't make a hole through the dough. Rotate the ball of dough while turning it with your thumbs, stretching the middle so it ends up looking like a plate with a thick rounded rim. Make the bottom dough membrane a couple of inches wide, at least, and don't be shy about this. You want the bialy to bake up with a thin crisp middle section (do as I say, not as I did when I made these the first time!). 

    Place the shaped pieces of dough onto your cornmeal-dusted baker's peel (the thing you'll use to slide them onto your baking stone, if you're using one). Fill each one with at least one rounded teaspoon (more if you prefer) of the onion filling. Spread a bit of it up the sides if you like, getting some of the poppy seeds on the doughy rim. 


    Slide the filled dough pieces onto the preheated stone. Bake for 8 to 10 minutes. Look for bialys that are lighly golden, not overbaked or dried out. Take them out as soon as they're done, and enjoy!


    (If you you'd like to comment on this post, or to read any existing comments, please click on the purple COMMENTS below!)

    Friday, October 1, 2010

    The Elmo Cake . . . Fat, Furry, and Skewered


    Well, despite my best intentions, I really didn't have enough time to bake anything fantastic or unique this past week. (Appalling, I know.) But, I just couldn't end the week without sharing at least something with you. As you may already know, I'm a part-time student in a baking and pastry arts program. I'm about halfway through the program and, overall, I must say that I love it. I keep learning such interesting new stuff.


    This semester, I have two classes. One is called Pastry I, the first serious pastry related course, and the other is an intermediate cake decorating class called, appropriately enough, Theme Cakes. So far, our work in the latter has focused on cakes for kids, particularly those requiring 3-D "sculpture" of one kind or another.

    This past week's cake creation featured a chubby, furry, wide-eyed Elmo. That's Elmo of Sesame Street fame, in case there's any confusion. Yes, as you can plainly see he's looking quite plump, perched comfortably atop a very tall 2-layer cake, iced in soft buttercream. My husband, at first glimpse from the back of the cake, thought for a moment that Elmo was some sort of hefty bear. Couldn't blame him. That little dude's sporting more fur than Big Foot. Though you might not want to eat him, you could safely do so without coming to any significant harm. Except maybe a belly ache.

     
    He's not exactly what I'd call a marvel of engineering but, for a novice like me, this fact is reassuring from the cake construction standpoint. His torso and head are indeed made of cake, while his arms were shaped out of homemade Rice Krispie treats. His legs are made from marshmallows trimmed this way and that. His eyes, nose, and mouth are fondant. The gift boxes on the cake are made from Rice Krispie treats too, covered in fondant, while the letters and numbers on the side are also fondant.

    This is the first cake I've ever worked on that required a long skewer be twisted into it, all the way down into the base (which--in case you're actually interested in this kind of stuff--consists of a royal-icing covered 1" styrofoam disk that was glued atop four layers of corrugated cardboard that were taped together). The skewer, in fact, impales Elmo right through the top of his melon and holds him securely in place. Doing this was kind of nerve-wracking but my teacher, bless her heart, was guiding me every inch of the way: "Turn the skewer slowly like a screw while you push it down. You have to screw it in."

    Uh huh. I skewered Elmo.
     
    Oh, and before I forget, this post was brought to you by the letters C-A-K-E.


    (If you'd like to comment on this post, or to read existing comments, please click on the purple COMMENTS below!)