I have, for weeks now, been in the throes of cleaning out my late parents' house in preparation for putting it on the market. I'm finally very close to being done, and I look forward to having more free time for holiday baking before Christmas is upon us. When you're sorting through the household miscellany, memorabilia, and detritus of a household that was occupied for 56 years by the same folks, you tend to encounter a few surprises--some extraordinarily wonderful, and others of the sort that will just have you scratching your head.
On the delightful side, I found a shoe-box sized container, tucked away in a seldom-visited closet, that was chock full of love notes from my father to my mother, most of them written in the months preceding their wedding day. Penned or typewritten on yellowed sheets of office scrap paper (they'd worked for the same company), the notes are without exception idealistic, funny, tender, and adoring. I can see why my mom saved every single one.

Toward the odder end of the spectrum, I found more springform pans than any one woman could use or destroy in a lifetime. I knew there were several stashed here and there in that house, having already adopted a couple of them when my mom first passed away, but I don't think I ever realized the true profusion that she'd accumulated over the years. She'd clearly been on a decades-long hunt for the perfect springform pan, relegating her cast-offs to the basement as she procured new and improved versions.
Some women of her era collected figurines and knick-knacks. She collected baking paraphernalia. And she did have a solid reputation for making truly fine cheesecakes--no doubt about that--so I guess she invested wisely.

About this recipe . . .
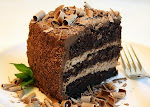
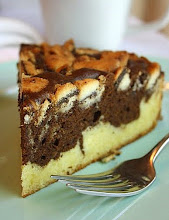
In celebration of that multitude of springform pans, I offer up this dark, dense, chocolate espresso cheesecake recipe. Where is it from? Well, you may laugh when I tell you that I adapted it from a recipe printed on a promotional wall calendar that came from an old-fashioned Italian bakery, in this neck of the woods, called Julian Bros. It turned out exceptionally well and I served it as one of the dessert options on Thanksgiving. If you love dark chocolate and coffee, you'll undoubtedly enjoy this cheesecake. If you prefer sweeter chocolate and don't care for coffee, make it exclusively with semi-sweet chocolate and omit the espresso powder altogether.

Triple Chocolate Espresso Cheesecake
(For a printable version of of this recipe, click here!)
Have ready one 9" x 3" springform pan. Preheat your oven to 300 degrees if you're using a dark-surfaced pan, and to 325 if you're not.
2 and 1/2 cups finely crushed chocolate graham-cracker crumbs
1/2 tsp. almond extract
1/2 cup plus 2 Tbsp. malted butter (I used unsalted.)
1 scant pinch of kosher salt
8 oz. of good quality dark chocolate (Avoid using chocolate chips.)
4 oz. of good quality semi-sweet baking chocolate (Again, avoid using chocolate chips.)
4 eight-oz. packages (2 lbs. total) of cream cheese, softened and no cooler than room temperature (Use a thick, reliable cream cheese like Philadelphia brand.)
3 large eggs, at room temperature (Important that they're not at all cold; you can warm them quickly from the fridge, in their shells, by placing them in a bowl of very warm water for a few minutes.)
2/3 cup granulated sugar
1 tsp. fine espresso powder (Or more, but only if you're completely crazy about this stuff.)
3 Tbsp. heavy cream (at room temperature)
1 tsp. vanilla extract
One 2 to 3 oz. chunk of milk chocolate, if you'd like to decorate the top of the baked cake with curls.
In a medium size bowl, toss the chocolate graham cracker crumbs with the salt; add in the melted butter and the almond extract, mixing with a fork until the crumbs are all moistened. Dump the mixture into your springform pan and press it firmly and evenly onto the bottom of the pan and an inch or so up the sides (don't worry if the sides aren't of even height all around). Set aside.
In a small bowl, whisk together the sugar and the espresso powder. Set aside.
Slowly melt the dark and semi-sweet chocolate together. This can be done in the microwave if you're very watchful and careful, heating for several seconds, then checking and stirring, repeatedly. Or, melt the chocolate in a double boiler on the stove top over low heat, being vigilant that not a single drop of water gets into the chocolate. Keep the melted chocolate slightly warm; it needs to be fluid but not hot when it's eventually added into the cheesecake batter.
In the large bowl of your mixer, on low speed, beat the cream cheese for a few minutes until smooth. If it still feels at all cold, keep slowly beating until it's truly room temperature. Into this, add the melted chocolate, still on low speed. Pour in the sugar mixture and the heavy cream, beating now on low-medium speed until well blended (you don't want to beat so quickly that you add air into the batter). One at a time, add in the eggs on low speed, beating until they're completely incorporated (perhaps a minute for each egg). Add in the vanilla extract.
Pour the batter into the springform pan over the crust. Bake in the middle of the oven, uncovered and without a water bath (believe it or not!), for approximately 40 to 50 minutes. Remove from the oven when the surface looks slightly dry and the cake still visibly jiggles in the center; don't overbake. Remove the cake from the oven carefully and let it first start to cool in a fairly warm spot, like atop the stove, on a rack. Leave it there to cool for at least an hour before moving it to a cooler spot to cool completely. Refrigerate the cake for at least several hours or overnight, still in its springform pan. Before removing the sides of the pan from the cake, run an extremely thin metal spatula around the upper half of the sides to help loosen it.
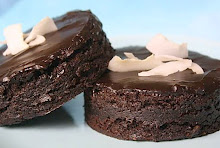
Decorate the cake top before serving with milk chocolate curls. Make the curls using a vegetable peeler and a chunk of chocolate that's room temperate or slightly warmer. The curls are very delicate, so don't touch them with your fingers if you can help it. Lift them onto the cake with a thin metal spatula, or something equally unlikely to break them.