We spent New Year's eve in what was for us a most unconventional way. A relaxing and uncrowded way. That afternoon, the four of us took an unhurried drive to the tip of the thumb--Michigan's thumb, that is--to pay a short visit to
Port Austin, a tiny village (the population hovers around 700) right on Lake Huron that has sentimental significance for my family. None of us had ever been there in the dead of winter and we were curious to see how it might look. On top of that, we had cabin fever after several days of post-Christmas lounging.
Port Austin is nestled right next to a federal Harbor of Refuge, which means it has a huge breakwater that makes it a haven for boating and fishing. During the warmer months it assumes the identity of a perky little tourist destination. But the rest of the time it's rather sleepy, and that's also part of its appeal. In the almost 45 years that I've been familiar with it, it has never become too big for its britches. It's not as if time there has stood still, but the best aspects of the place have been remarkably well preserved despite the passage of decades.
When I was a child, you could walk through the entire downtown in about five minutes if you didn't stop and linger, and it's still exactly like that. Each time we go there I'm relieved to see that pretentious boutiques and absurdly expensive restaurants haven't managed to swoop in and take over. It's a welcome-respite kind of a place. It may be humble, but it's certainly well loved. Port Austin is still an authentic place.

Upon arriving, we went first to the harbor and said hello to the lake. The wind there was fierce. We saw only one fellow, geared up for ice-fishing and heading out to a shanty not far from shore. My husband and oldest son strolled out onto the breakwater. Brave souls, those two. Back in the village, we were the only late-afternoon lunch customers in a cozy mom-and-pop place called The Stock Pot. After having a bite, we drove along the edge of the lake to a beautiful beach in a state park outside of town. We passed a man slowly walking his dog on the long road leading in but then we saw no one else, and we were truly alone.
We parked our car and hiked a short trail over the dunes before the water came into view. It was about half an hour before dusk. The clouds looked like thickly piled quilts. They were a hundred shades of wintery blue, as if they'd spent all of 2012 soaking up the colors of the lake.
The dune grasses were weighted here and there with snow, and the most exposed clumps of grass blew back and forth like smoothly brushed hair. On the shore, the sand felt stiff and almost frozen underfoot. Except for the constant wind, all was quiet.
It was the best New Year's eve. Somehow, for me, that simple experience emphasized the freshness of the approaching year. Our four-person celebration wasn't champagne drenched, action packed, or confetti strewn, but it was great. It was more than enough.
About this recipe . . .
What does all of the above have to do with today's kaiser rolls? Almost nothing, except that after we returned home that night I started jotting a list of items to bake in 2013. Kaiser rolls were first in line. I scanned my bookshelves for recipes before settling on this one. It's not overly involved and not too time consuming. It results in a slightly sweet, just-dense-enough sandwich roll. And, it doesn't require a pre-ferment/starter or any odd ingredients (unless you consider poppy seeds odd). The formula is adapted from
Breads--one thin volume from a series of paperback cookbooks that was produced in 1985 by the
California Culinary Academy.
And about that swirly thing . . .
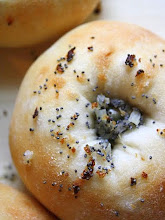
The most interesting aspect of making kaiser rolls, if you ask me, is the business of creating the spiral design. There are a few differing schools of thought when it comes to achieving that distinctive kaiser swirl, and they're not all created equal.
There is the traditional and frustrating thumb-fold technique, which doesn't seem to have a big fan-club. This method involves keeping one's left thumb stuck inside a curled fold on the left side of a little circle of dough while the rest of the fancy folding is done with your right hand, until that left thumb is eventually allowed to leave its spot and that final fold is tucked "into the bottom dough under the first fold" (got that?). That old-school approach isn't too popular now, even among modern master-bakers like
Peter Reinhart. He more or less tells readers of
The Bread Baker's Apprentice not to bother with it (he actually compares it to "making a paper flower") and suggests the simpler alternatives of shaping the dough into knot rolls or using a special kaiser-roll stamp/cutter (see that blue thing below? . . . that's a kaiser roll stamp) to achieve the iconic shape.
Meanwhile, authors Stanley Ginsberg and Norman Berg of
Inside the Jewish Bakery: Recipes and Memories from the Golden Age of Jewish Baking, agree that "kaisers are far and away the most difficult rolls to fold correctly . . ." but they go on to provide a murky black and white photo-tutorial for those folks who still want to try it. I found the tutorial only minimally helpful in attempting the tricky fold (thanks anyway, Stan and Norm).
The last option offered by the experts is to manually cut five curved slashes in each roll with a razor blade or a
baker's lame (see that green thing above with a blade at the end? . . that's called a lame, pronounced like the name Tom). Hmm. So what's a home-baker to do? Well, I took a swing at all four shaping methods--folding, knotting, stamping, and slashing--with any number of variations thrown in before settling on the last option as the best. Yes, I had the most success with the slashing method. (Should I admit that I did the slashing with that scalpel-like tool while holding each dough ball in the palm of my hand? Probably not. I should just keep that to myself, lest I be considered suicidal.)
In any case, whatever shaping technique you decide to use, expect a yummy roll. That's what really matters.
Poppy-Seed Kaiser Rolls
(For a printable version of this recipe, click here!)
Yield: 12 sandwich size rolls
1 and 1/2 tablespoons instant yeast
2 cups warm water
1/4 cup granulated sugar
2 teaspoons fine sea salt
1/3 cup canola oil
6 to 6-and-1/2 cups unbleached all-purpose flour
Egg white from one large egg, mixed with 1 tablespoon of water
Poppy seeds
(I'd have more than necessary on hand if I were you; you might actually use half a cup or less, but don't skimp. If you can't find, or you don't like, poppy seeds, try sesame seeds.)
In the large bowl of your mixer, using the paddle attachment, mix the water, sugar, salt, and oil on low speed just until combined.
In a separate mixing bowl, combine four cups of the flour with the instant yeast; stir or gently whisk in the yeast. Add into the liquid ingredients.
Still using the paddle, mix on medium speed for five minutes.
Now on the lowest speed, add in 1 and 1/2 cups of the flour. The dough will be quite soft.
Dump all of the dough out onto a well-floured board (use some of the remaining flour that you first measured out, starting with about 1/2 a cup and adding more as needed).
Flour your hands and knead the dough until it's smooth and elastic. By the time you're done it should feel tacky but not sticky. This will take about ten minutes if you knead energetically and maybe up to 15 if you knead more gently. Add just enough of the remaining flour to keep the dough from sticking to your board and to your hands.
Put the dough into a large, clean mixing bowl that's been sprayed with vegetable spray, oiled, or greased with shortening. Turn the dough over so it's lightly coated. Cover the bowl with plastic wrap that's also been greased, and cover the whole thing with a dish towel. Put the bowl in a warmer-than-room-temperature spot. Let the dough rise for about an hour, until it's doubled in size.
On a very lightly floured surface, dump out the dough and push on it with your palms/knuckles to deflate it. Invert your bowl and use it to cover the dough; let the dough rest like that for 10 minutes. Using a bench knife, or a sharp chef's knife, divide it into twelve equal pieces (they will probably weigh around 4 oz. each, more or less). Shape each piece into a ball, being sure to pinch tightly closed any seams on the bottoms. Cover one large or two regular size baking sheets with parchment paper and place the balls on them, about two inches apart. Cover the balls with sprayed/greased plastic wrap. Lightly cover them with a dish towel and put them in a warm spot to rise.
Preheat your oven to 400 degrees. Spread a layer of poppy seeds on a tray. Whisk the egg white and 1 tablespoon water in a small bowl. Have a pastry brush standing by.
Once the dough balls have risen for about 30 minutes, until almost doubled, brush the tops of all of them with the egg wash. Then, one by one, gently pick them up and dip them in the poppy seeds. Set them back on the parchment. Using a baker's lame or a razor blade, carefully cut five small slashes on each dough ball, starting from the center and moving outward, creating a spiral design on the top of each one. Don't cut too deeply, but don't be too timid either; try to cut about half an inch deep.
Bake in the middle of the oven. As soon as you put the dough in, quickly mist some water into the oven as well (be careful not to aim water at the lightbulb!). Bread dough likes a steamy atmosphere.
Bake for approximately 20 to 25 minutes. The rolls should be golden brown, with slightly darker bottoms, and their internal temperature should be at least 190 degrees (up to maybe 210). Let the finished rolls cool on a rack.
These freeze well, and also make great hamburger buns.
(If you'd like to comment on this post, or to read any existing comments, please click on the purple COMMENTS below.)